Lighting the lights:
Designer’s tabletop lamp product photography tutorial

I like to shoot products, working quietly in the studio, putting all my skills and creativity to get job done. There are three major types of product shots we are dealing with:
1. Sometimes it is ugly prototypes, where post-production and retouching may take ten times more efforts than photoshot itself. They are good challenge to work with, and it helps a lot:-)
2. Regular off the shell products, with shape and finish that can be very straight forward to shot or require hours of complicated setup built and very precise lighting to be done right.
3. Designers products, which are very unique and usually very interesting to work with.
In this article I’ll show our recent photoshot with a third, most enjoyable to work type of product.
I am talking about the photo-shot we had recently for Doug James (StudioDoug.com). He brought very interesting and unusual products of his studio to be photographed: LED tabletop lamps along with other cool stuff.
First lamp:
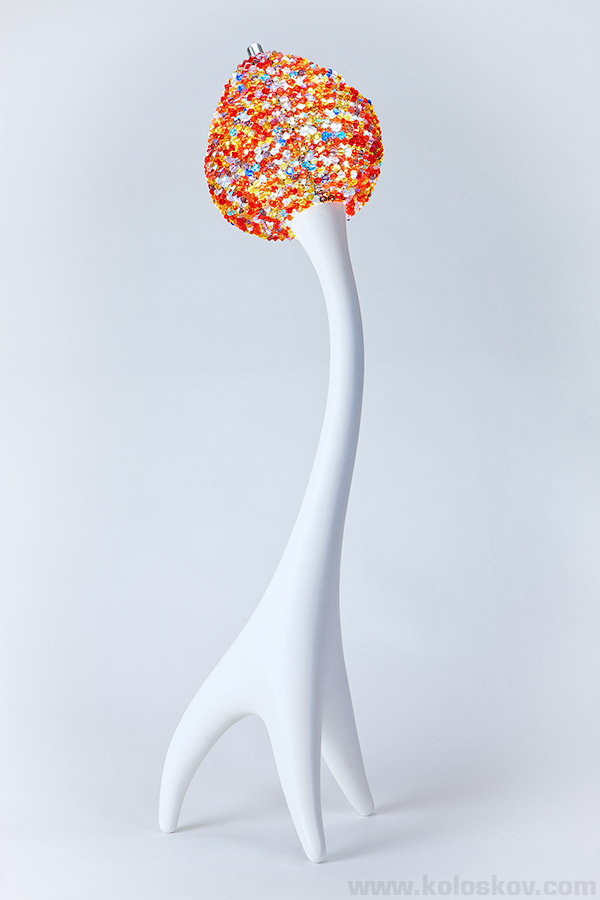
Atlanta product photographer image example
The requirement was to have all of them done on a seamless white background, therefore Manfrotto (Bogen) shooting table was used.
A little tricky part was to capture lamp’s own light: Each one uses a few hundreds of LED, and combined with the colorful beads it gives amazingly beautiful light.
However, LED was not powerful enough to match the power of few hundred watt second strobes (I do not think that such powerful LED exists at all), so we did this:
After we were done with regular shots with lamp off (1/250 sec shutter, F10 ISO 100) we turned off all the lights in the studio along with modeling lights for all moonlights used.
Then, shutter was set to 1/20 of a sec, exactly what a 2° spot camera exposure meter suggested for a lamp’s LED head to be expose correctly. No other parameters was changed.
Mouse over on a shot below to see how it looks with 1/20 sec, turn on the lights!
Tabletop lamp photography lighting tutorial example
Timehead man :-)?
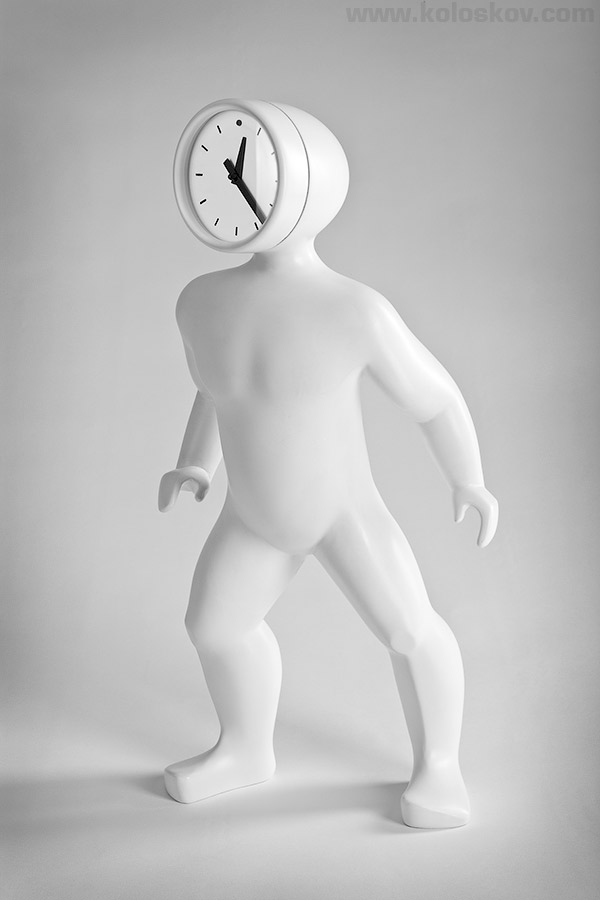
Time in the head
The lighting setup:
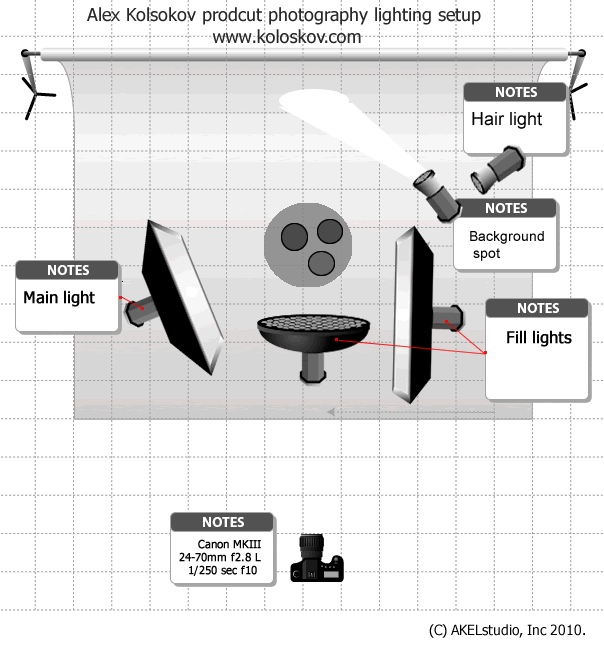
Product photography lighting setup diagram
The lighting setup is quite simple : Medium-size softbox from the left for the man light, right with a strip box as a fill light. This can be easily reversed by changing light ratio, sometime it better for other side to be lighter (like we did for this clock guy: fill light become a main (by increasing the power), and main became a fill light.
Beauty dish on the top mostly for filling the background.
The hair light on the right is for a lamp’s head only: I did not want to be any edge on the lamp body. Background light is to make it brighter and for overall brightness control, not relaying on a reflected light here.
Now, the most interesting part.
This is not what we do often, but this time I’ve asked Doug if we can use one of his lamp to create more dramatic and creative image, something to catch people attention. This shot was not a part of the original requirements, but something we will do for ourselves.
He agreed, and we did it: not only a producing an amazing photo, but also got a video behind the scene tutorial explained on how we did the whole shoot.
I really like this: we got a great image for the portfolio, gained experience and also created a video tutorial, all from the same shot!
Dramatic look of the same product:
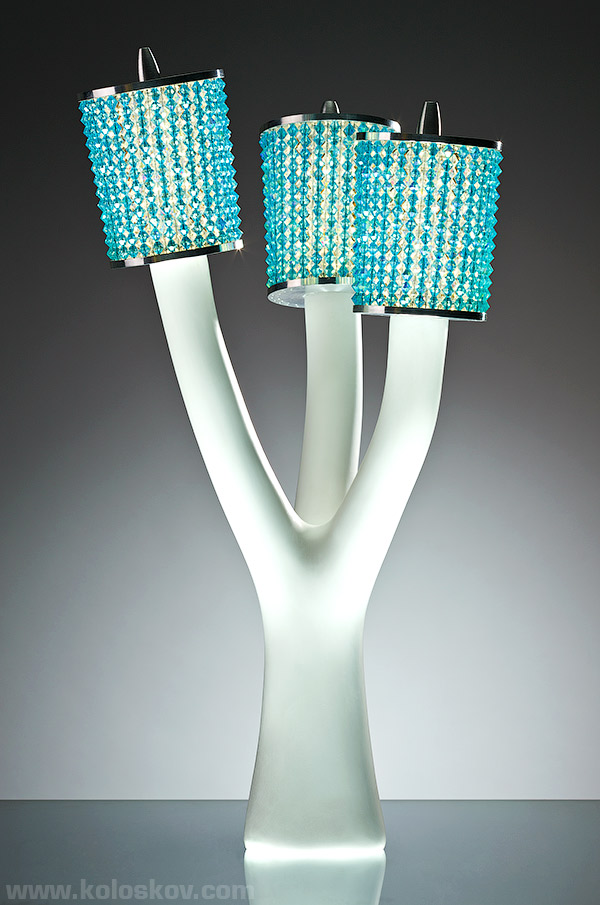
Dramatic lighting of the tabletop lamp
The lighting setup:
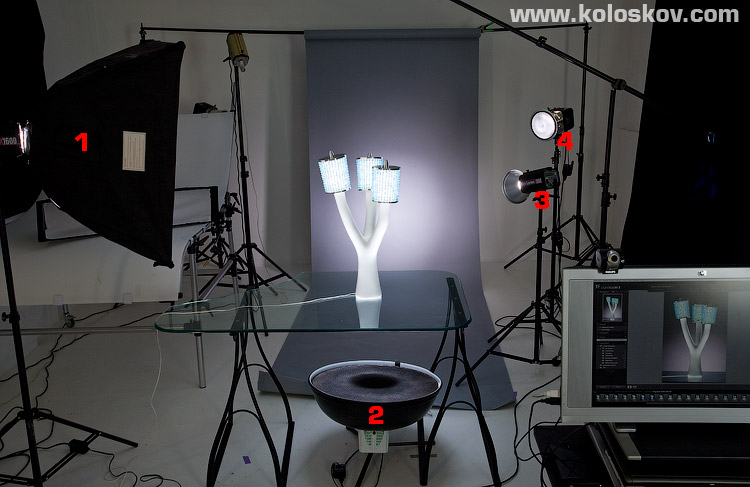
Lighting setup for a product photography
Because of the shape of this lamp I’ve decided to use main light (2 AB 800, 30° grid) directly from the bottom, through the glass table.
Fill light from the left (1, WL 1600), only to add little shiny marks on a lamp’s head metal cap and the bottom. Hair light (4 AB400 through 20° grid) was used to get an edge on the lamp’s body, head was not exposed by it.
Number 3 (WL 1600 20 º grid) was for the background, to create a halo-like spot coming from a table..
Before and after images of the lamp from our retoucher on post-production blog, check them out: you’ll like this!
Camera gear:
Canon EOS 1Ds Mark III DSLR
Bogen 055 XPROB Tripod with 405 geared head
Canon RS-80N3 Remote Switch
Canon Right Angle Finder
Canon 180mm f3.5 macro L and Canon 24-70mm f2.8 L lenses
Lighting, light modifiers and accessories:
Paul C. Buff Lighting: 1×1600WS, 1×800WS, 2×400WS
AlienBees/White Lighting reflectos with various honeycomb grind
Paul C. Buff Cyber Commander 16 channels remote control with CSR+ receivers
Adobe Lightroom 3 Beta 2 as a remote capture solution for tethered shooting
Manfrotto (Bogen) shooting table
All shots were done with: shutter speed 1/250 sec, F10, ISO 100, Custom WB 6100K
Let me know what do you think, your feedback is always a good sign for me:-)
~Alex
