The best way to improve your photography skills, or why feedback from a community is so important
Evolution of a Shot and Getting Out of Your Comfort Zone
Hi ! I am Patrick Mével, a photographer based in Québec City, Canada. Let me tell you a bit about myself, how I came across Photigy, and how it is helping me improve my product photography skills.
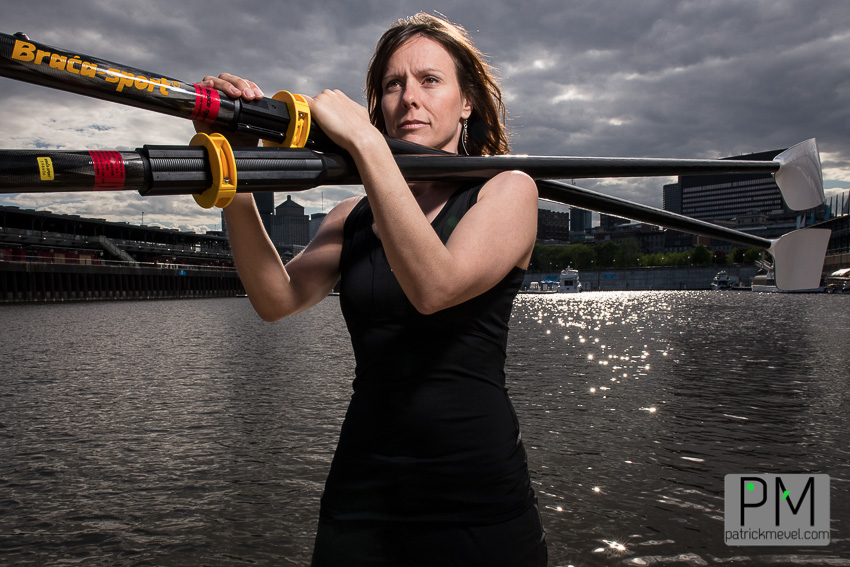
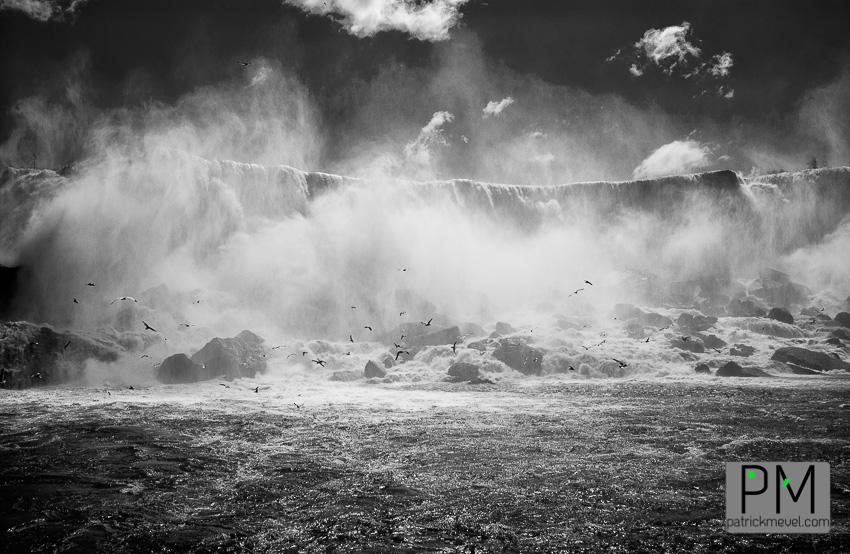
As a photographer, I have been shooting mainly landscape, editorial and corporate portrait, some sport, some architecture. I have had several publications in French and Canadian newspapers and magazines, like ELLE Québec and Reader’s Digest. Here are two examples below of my usual genres. You will find more on my web site (http://patrickmevel.com).
My “style” is to get the shot as right as possible in camera, and to use post-production only to optimize it, to bring it to a higher level of maturity. I often use the analogy of gourmet cuisine or wine-making. The ingredients have to be carefully chosen and it takes expert skills to combine them.
Post-production comes eventually on top – if necessary – but should remain discreet. It is the salt & pepper, the nice background music, the lovely waitress, or the eye catching label on the wine bottle. All these elements add to the experience but are not crucial. Without them, I would still enjoy my meal! That is my philosophy applied to photography, but not everyone has to have the same point of view.
Now that you know where I come from, photographically, how did I get into product photography and how did I come across Photigy?
I am more of an introvert kind of guy and I find that what many other photographers are shooting for a living – weddings, babies in all sorts of containers, “trash the dress” sessions, you name it… – is not what I enjoy doing (but I fully respect those who are doing it).
I have always been interested in product photography. Taking inanimate objects and creating some sort of mood, maybe even character, through lighting, shadows, textures and other tricks, was definitely attractive to me, but I never took the time to really dive into it.
Rob Grimm, a product photographer from St-Louis (MO, USA), said that he photographs objects because “they don’t talk back”. That made me laugh for a few seconds and then I thought “wow, that’s so true”. It just clicked in my head. My two brain hemispheres got suddenly connected. Product photography is extremely technical – you need to understand everything about light, textures, shapes – and requires a lot of creativity and emotions too. And it has the nice added bonus of allowing you to work in your basement at any time of the day or night, something that suits me very well.
From the hundreds of photography web sites I surfed over the years, I vaguely remembered some videos of Alex Koloskov, this guy with a direct style and a Russian accent. I found out that he had now a web site, Photigy.com, dedicated to product photography. I joined it and after going through the free videos that Alex offers, I purchased the so-called “Advanced Product Photography Essentials Pack”.
Luckily its content is much more straightforward than its title.
It contains many hours of video and several e-books explaining the ins and outs of product photography. Soon it was time to submit for review my first real product shot to Alex and to the Photigy community (there is a a special “support forum group” aimed to help Photigy photographers who work on this course – /Alex.K/). And I am going to describe what this process looked like.
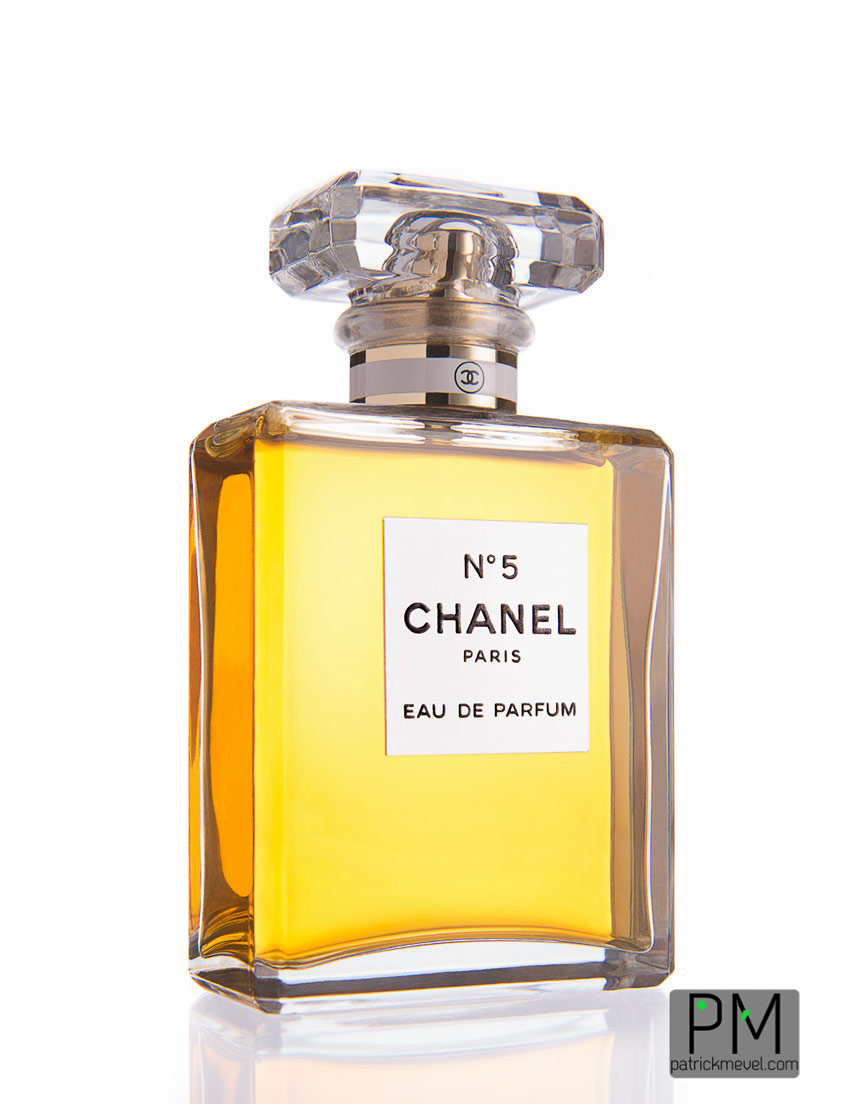
I chose the best looking perfume bottle we had at home and, coincidentally, it might as well be the most famous fragrance in the world: Chanel n°5. So, that sounded like a good choice.
You will find below the sequence of events.
Evolution of a Shot: Chanel N°5
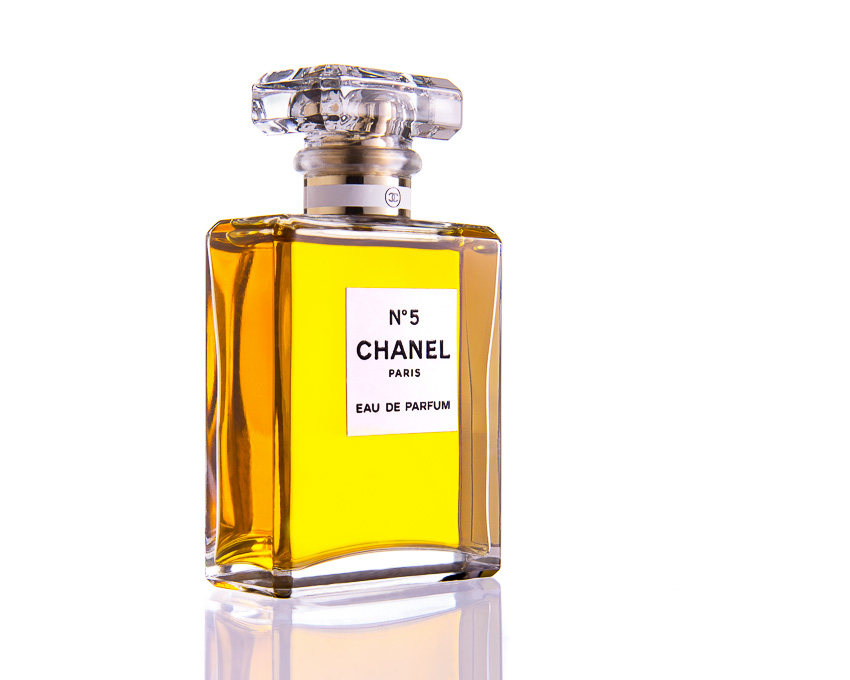
1. This is the straight shot out-of-camera, without any modification

2. After basic contrast adjustment and cropping in Lightroom
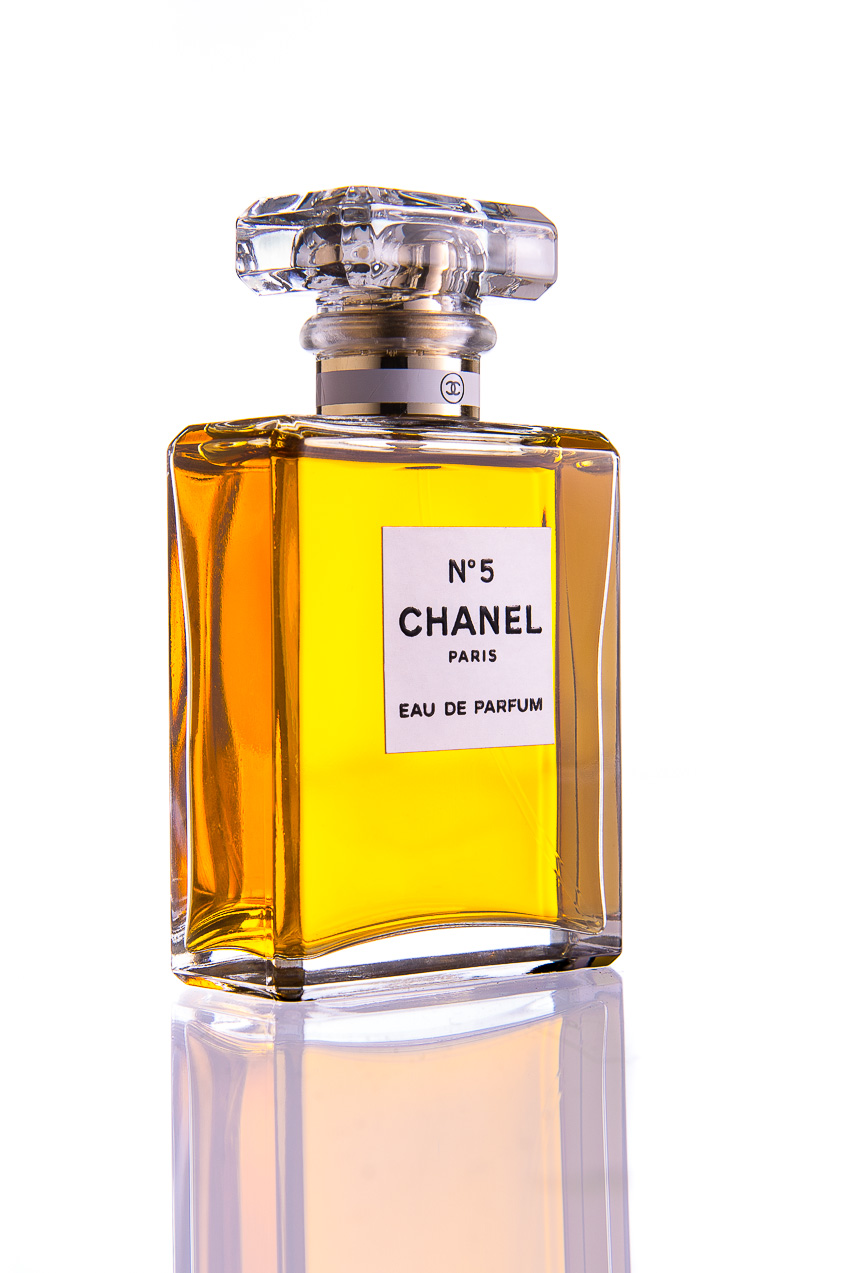
3. After some more retouching in Photoshop, that was the version I submitted for review in the Photigy forum.
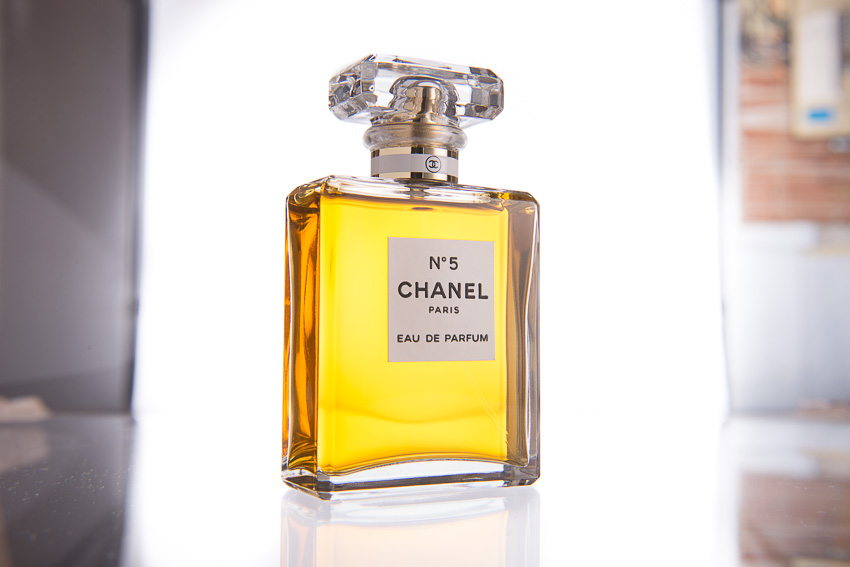
4. The shot received some very good feedback. It had some potential but mainly three issues: many reflections on and inside the glass needed retouching, the label was unfortunately aligned with the right side of the bottle, and the reflection in the shooting surface in front of the bottle was too dark to look natural.
5. I must say that even though I agreed with the feedback received, I overall liked the shot and I was not too bothered about it not being “perfect”. In all my other shooting styles, I consider it is important to get the shot right, or as right as possible, in camera. While this is a healthy – and necessary in my opinion – attitude for a photographer, I was not quite ready to do as much retouching as what the community indicated was required, particularly about the internal reflections. This seemed to go against my “philosophy” about keeping things as real as possible.
The very distracting alignment of the label was my main gripe about the shot.
6. Knowing too well that it takes sometimes a while to be able to objectively analyse one of your own photographs, I decided to leave it aside for a few days, maybe even for a couple of weeks.
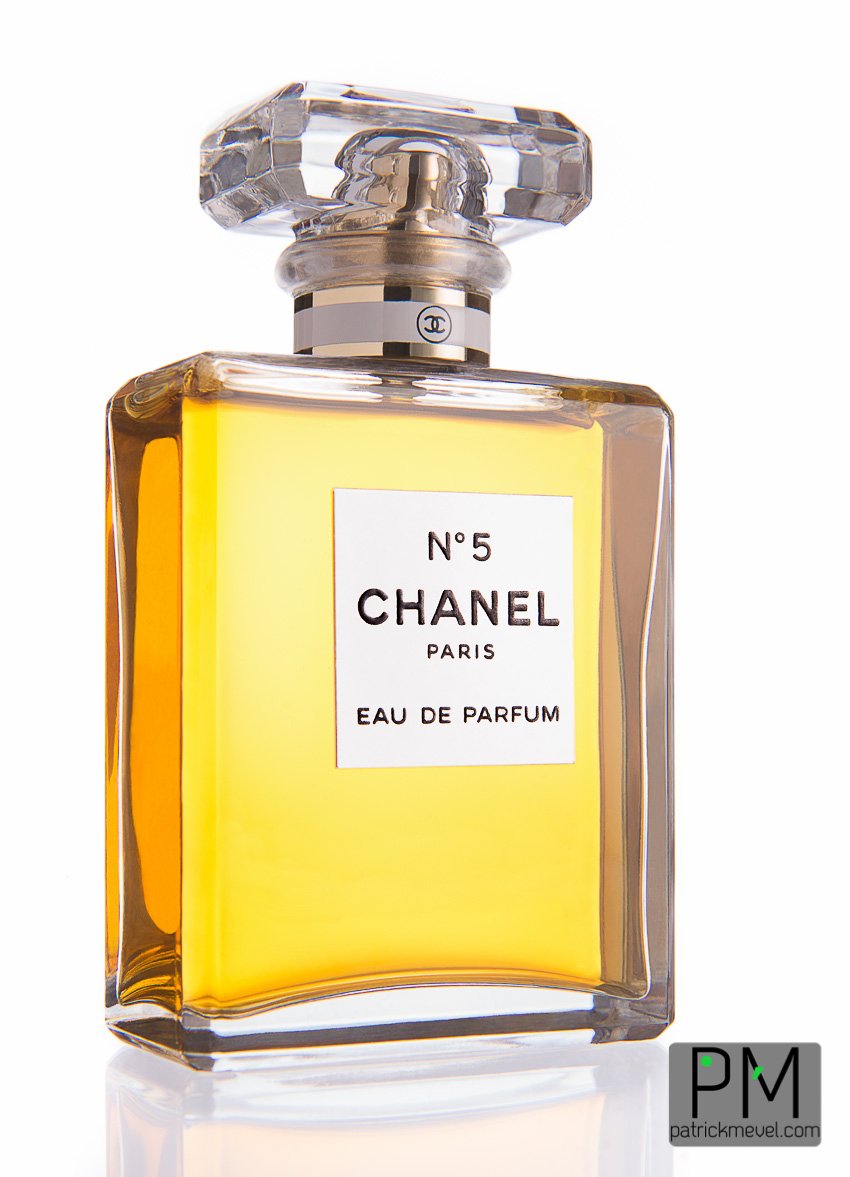
7. After some more rumination, it was clear that I could not live with the label alignment issue and I could not accept to fix it in post-production. That would have crossed the line according to my own – rather rigid – ethic. So I re-shot it completely, this time making sure that the label was in a better position. Also I took the picture slightly from below, with a wide-angle lens, to make the bottle more massive. That’s a trick I learned from one of Alex’s tutorials.
8. That was a much better raw material. I liked the label and the front reflection, but I still had a hard time about the comments saying that the black reflections should be fixed. That just did not feel right to me. I spent a lot of time during the shoot tweaking the lights and modifiers, and I did not manage to get rid of them “naturally”. They must be part of the bottle and one has to respect that, I said to myself. If you really don’t want to see those marks, then do a straight frontal shot so that only the front side is visible. Actually I looked on the Internet for Chanel n°5 pictures and what you find is mostly straight frontal shots. In addition most of the pictures do not seem as retouched as what the Photigy community wanted me to do (if you need to see it to believe it, have a look here).
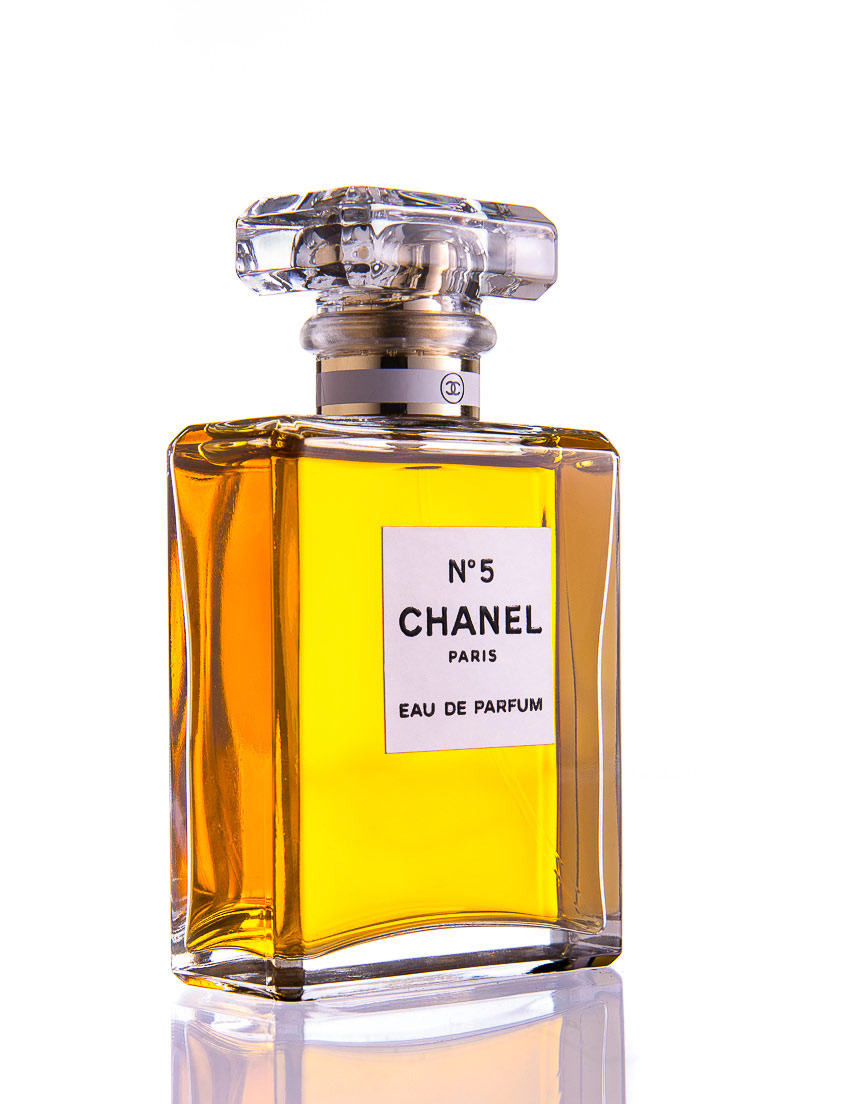
9. At some point, I figured out that I was probably being too narrow-minded and that I should go out of my comfort zone and experiment further. I got some help from my wife who is more artistically skilled and more open-minded about post-production. Who knows? Let’s try, I might like the result. Indeed I did like where she took the picture. I liked it so much that I took it even a bit further, and submitted the final version to Photigy.
Could it be taken further? Certainly. Would I feel comfortable about this? Probably not.
As it is now, this bottle still has the essence (no pun intended) of what I saw in my viewfinder during the shooting session. It is just an optimized, more mature version of it, and I like it so.
I think this creative, iterative, collective process has taught me a lot. If you want to improve your skills you need to go to the right place and “meet” the right persons, and then you must adopt an open-minded attitude and be willing to go out of your comfort zone. If you don’t like what results from this exercise, fine. It is not a big deal. Just come back to the previous version. You might just have confirmed your limits. But you may as well have pushed them.
I’d like to thank the whole Photigy community for sharing so much knowledge, and particularly Flo for pushing me where I was so reluctant to go.
I plan to soon add products to my portfolio.
Here’s the before-after comparison of the first shot I submitted and the final one:
[beforeafter]
[/beforeafter]
Patrick Mével is a French photographer now located in Québec City, QC, Canada.Coming from a landscape and editorial portrait background – with publications in magazines like Reader’s Digest and Elle – he decided in 2013 to add product photography into his portfolio.His keen interest in getting it right in the camera is sort of challenged by the obvious need for post-production in product photography. So he is learning to accept this as a fact, but he will never surrender and say « This will be fixed later in Photoshop » !
[vc_row bg_type=”bg_color” bg_override=”3″ bg_color_value=”#f7f8f9″][vc_column][vc_row_inner css=”.vc_custom_1458771887597{margin-bottom: 0px !important;padding-top: 10px !important;padding-bottom: 10px !important;background-color: #f7f8f9 !important;}”][vc_column_inner width=”1/6″][vc_icon icon_fontawesome=”fa fa-graduation-cap” color=”custom” background_style=”rounded” background_color=”custom” size=”lg” align=”center” custom_color=”#27485c” custom_background_color=”#ffffff”][/vc_column_inner][vc_column_inner width=”5/6″][vc_column_text css=”.vc_custom_1458772878382{border-top-width: 0px !important;border-right-width: 0px !important;border-bottom-width: 0px !important;border-left-width: 0px !important;padding-top: 10px !important;padding-right: 10px !important;padding-bottom: 10px !important;padding-left: 10px !important;}”]
Photographers also take these courses
[/vc_column_text][/vc_column_inner][/vc_row_inner][/vc_column][/vc_row][vc_row css=”.vc_custom_1458771864918{padding-top: 0px !important;padding-bottom: 25px !important;}”][vc_column][vc_column_text css=”.vc_custom_1458771875891{padding-top: 0px !important;padding-bottom: 15px !important;}”][related_courses cid=”2564″ noc=”3″ ][/vc_column_text][/vc_column][/vc_row]
Cindy Koller
Patrick,
Having come to Product photography from a similar background as you, I completely understand your initial hesitance to do any major photoshop work to your photos. In fact, for much wildlife and nature photography, such as for Natural Geographic, almost any changes to the photo are banned. However, when dealing with commercial photography like advertisements or selling pretty faces, or food, reality goes out the window in favor of desired reality!
The other day I had to make a package or wrapped up cotton candy look good! [lol] But, at the same time I believe my target audience was 3-12 year olds.
Leo
Hi Patrick,
nice article, thank you. I have just a small request. As Alex is used to do, could you add the light schema?
Thanks.
Leo
charles sweigart
Your analogy to food is interesting and true but the appearance of the food is not mentioned. Gourmet meal just plopped on the plate will be just as tasty as the same meal which has been artfully arraigned on the plate. The fine wine served in a proper glass in the restaurant will taste the same as the identical bottle wrapped in a paper bag and consumed in an alley. Photography of product is all about the appearance. It is all about being desirable or in other words sexy.
Let’s use an analogy to a beautiful starlet instead. Her face is beautiful as is, but when viewed in the right light source from the right angle she becomes even more attractive. When make-up is applied she gets even better. Post processing is the make-up applied to the image to correct the natural flaws that people and products have in certain settings.
If the companies that use and pay for the images we create were to begin to accept the flaws instead of demanding a perfect looking, most sexy looking image for their ads, we could just capture in camera and be finished. Sometimes a little make-up will be the only way to get the desired results.
Thank you for your informative look at your work and opinions on post processing.
Patrick Mével
Hi Charles,
Thanks for your comments. You are exactly right. Some make-up definitely makes the starlet or product even better looking. It is a matter of applying it with (good) taste. Glad you appreciated to have the process and my opinions described. Cheers!