Alien Perfume Bottle Shot and Post Production:

Pre Planning Stage
This is one of my wife’s favourite perfumes, and I’d been keeping track of how far down this particular bottle she was getting for quite some time before I finally managed to ‘acquire’ it for the shot. At the cost of a new one obviously…
Spending some time studying the bottle, I knew I was going to have to nearly surround it with diffusion material/panels because the gold coloured plastic parts were highly reflective, much like jewellery – they were reflecting what was in front and to the sides and both above/below and behind.
Add to this, I was planning to incorporate paint splashes from all angles which would mean lighting the bottle and the paint completely separately. The set up for the bottle would have to be removable from the scene without altering the position of the bottle itself, both the bottle and the camera position would need to remain fixed so to ensure the compositing of separate paint splash shots against the bottle would be properly aligned.
The Set Up

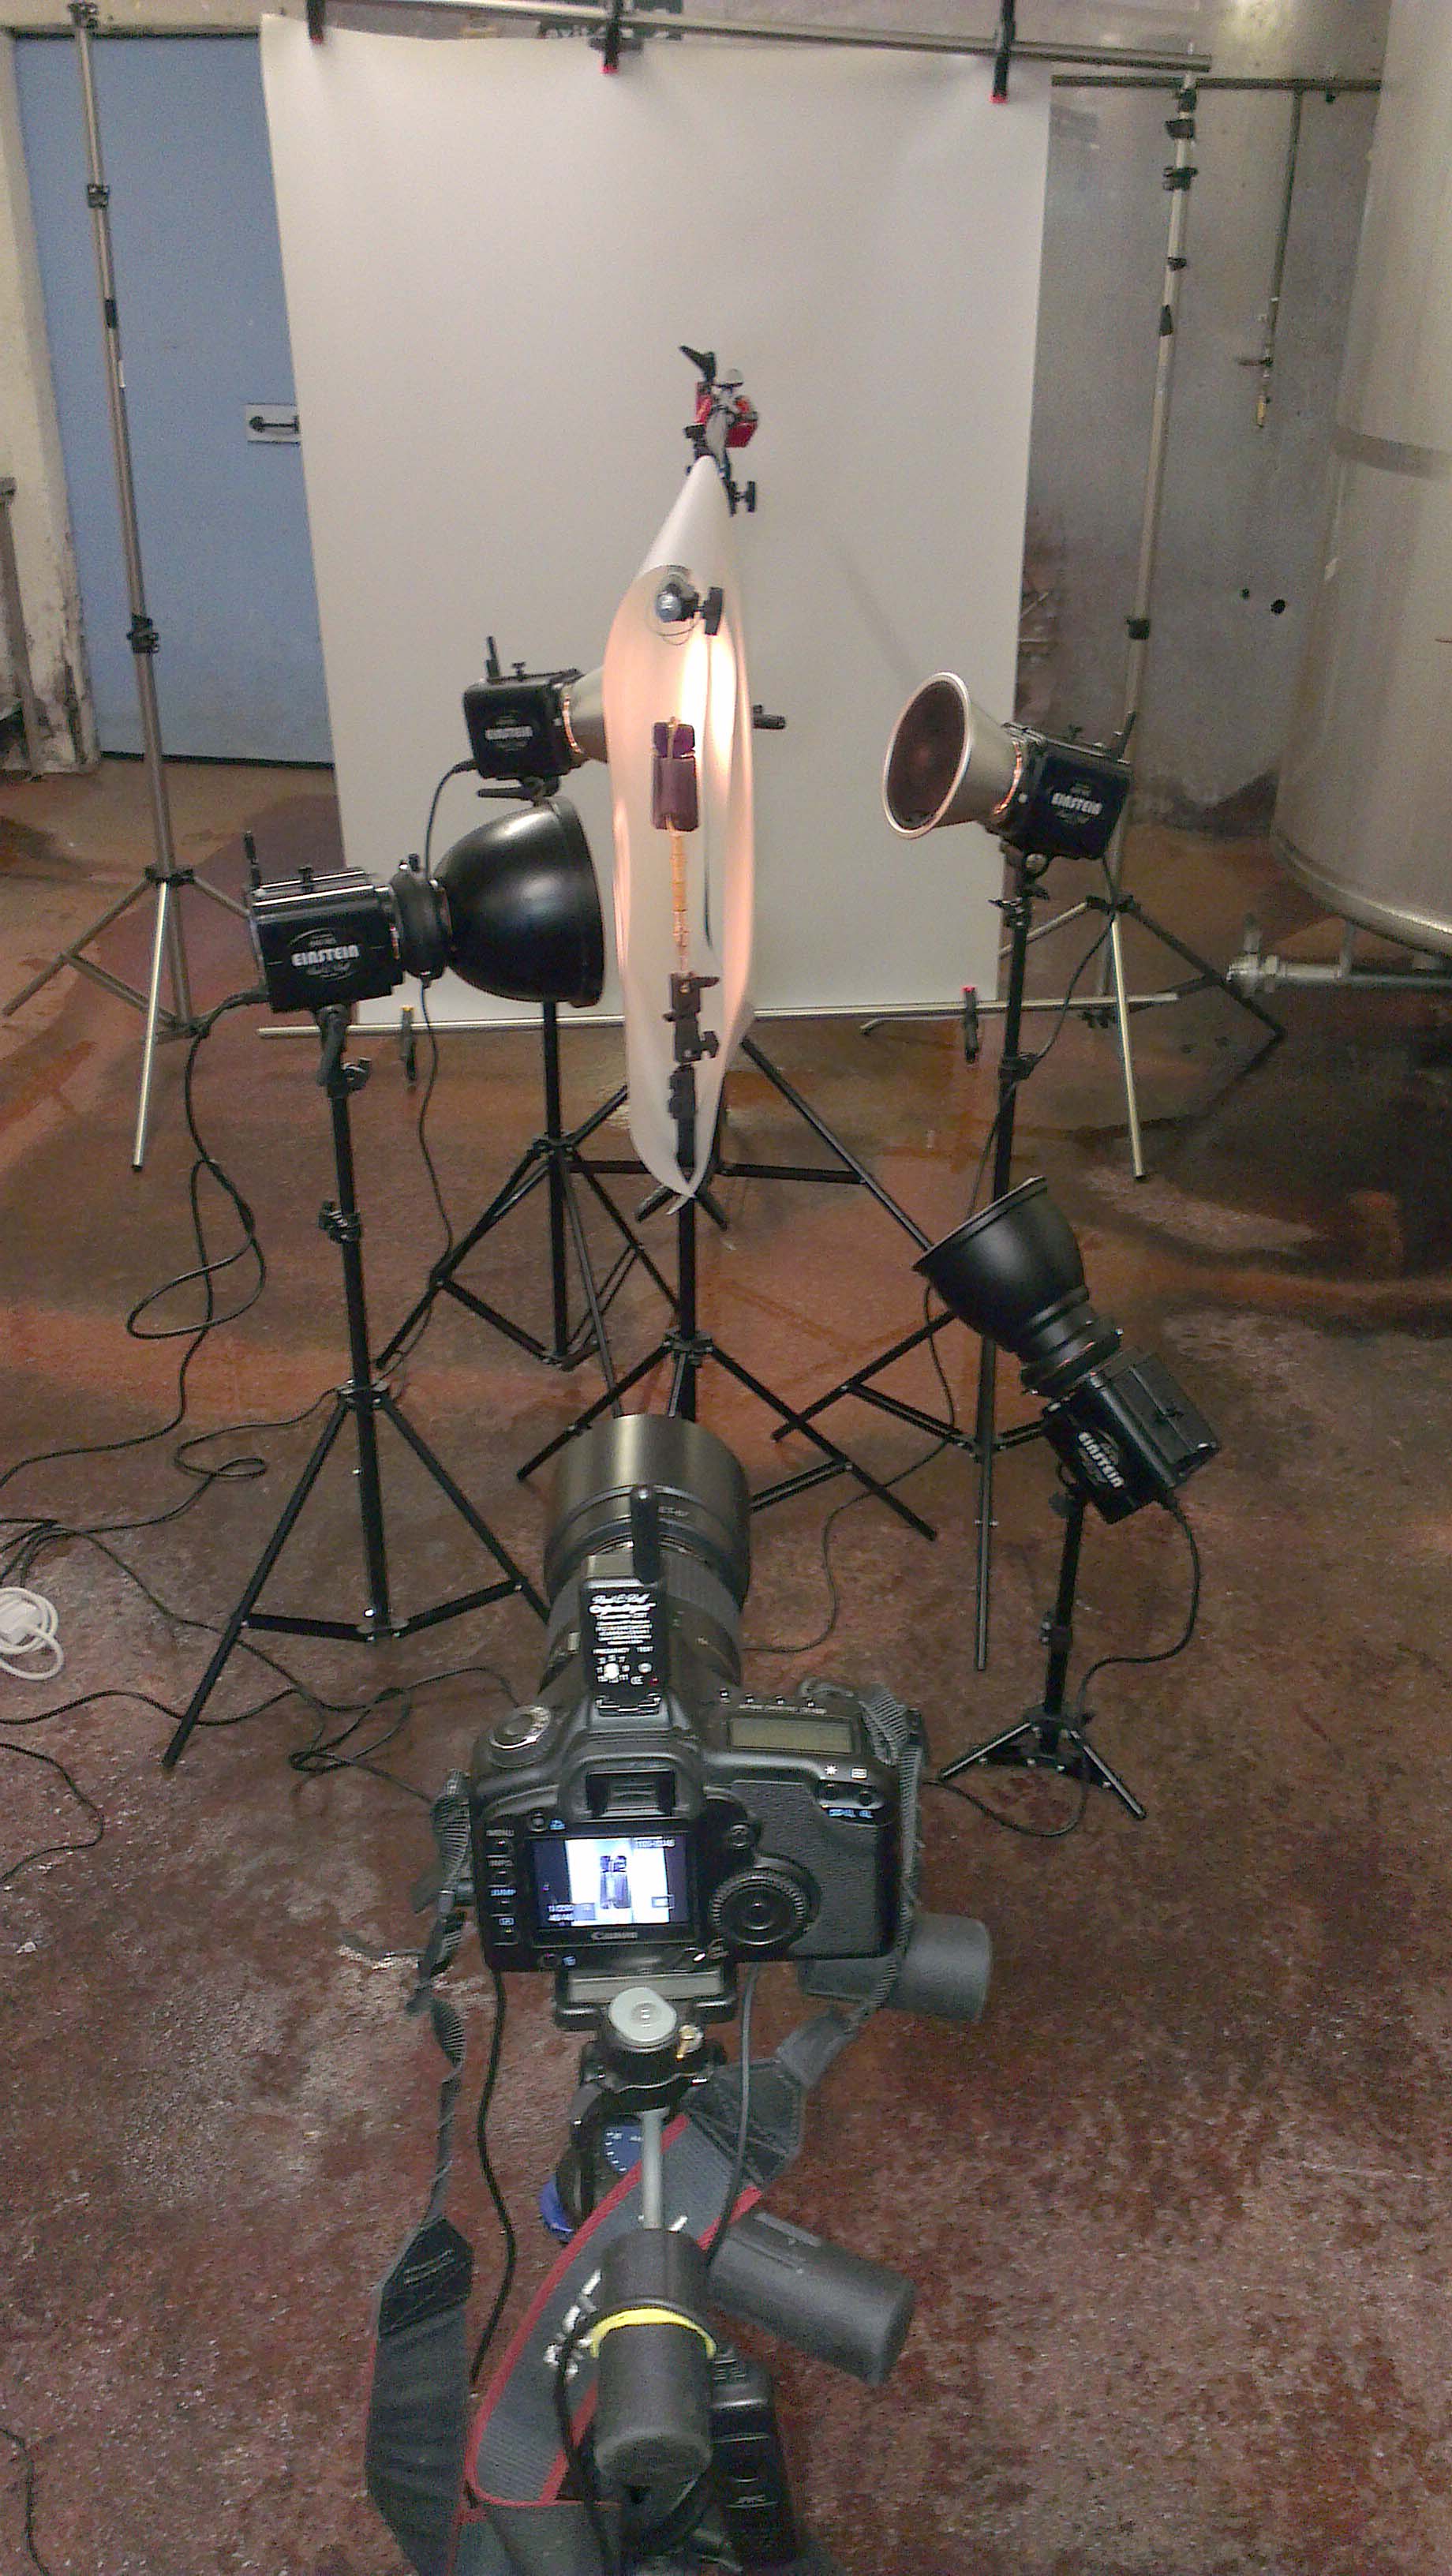
As you can see from the above shot, I’ve ended up using the simplest set up possible. The bottle had a 3/8″ nut glued to its underside and was mounted via a few spigots onto a light stand. I knew the bottle would require a lit background behind it to reveal the brand logo, and I knew I’d want to try and throw some controlled reflections across each of the facets to detail the overall shape of it.
Initially, I set up large diffusers fairly close to either side. These left me space to hit the bottle with hard direct light from behind to get some internal reflections happening. Problem was that this was never going to work for the curved glossy plastic parts, they would need lighting from all angles and I didn’t want to composite separately lit parts of the bottle together.
After trying a few other things that didn’t work I decided to throw a sheet of translum diffusion plastic over a boom arm and clamp it together behind and below the bottle to pretty much surround it. One of the guys ( I believe it was Andy Mclaughlin) shot a silver pendant with this set up very recently and got a great result from it, so I figured it could also work here. Also note the larger sheet of Translum set farther behind, this would be used as a background for the paint splashes afterwards.
Using four lights with 10 and 30 degree grids attached, I was (painstakingly) able to light each of the various surfaces and back light the bottle whilst also getting the required gradients on the glossy plastic parts of the bottle. Starting with the rear lighting for the brand name, I added one light at a time. Altering distance, angle and power to get the desired results.
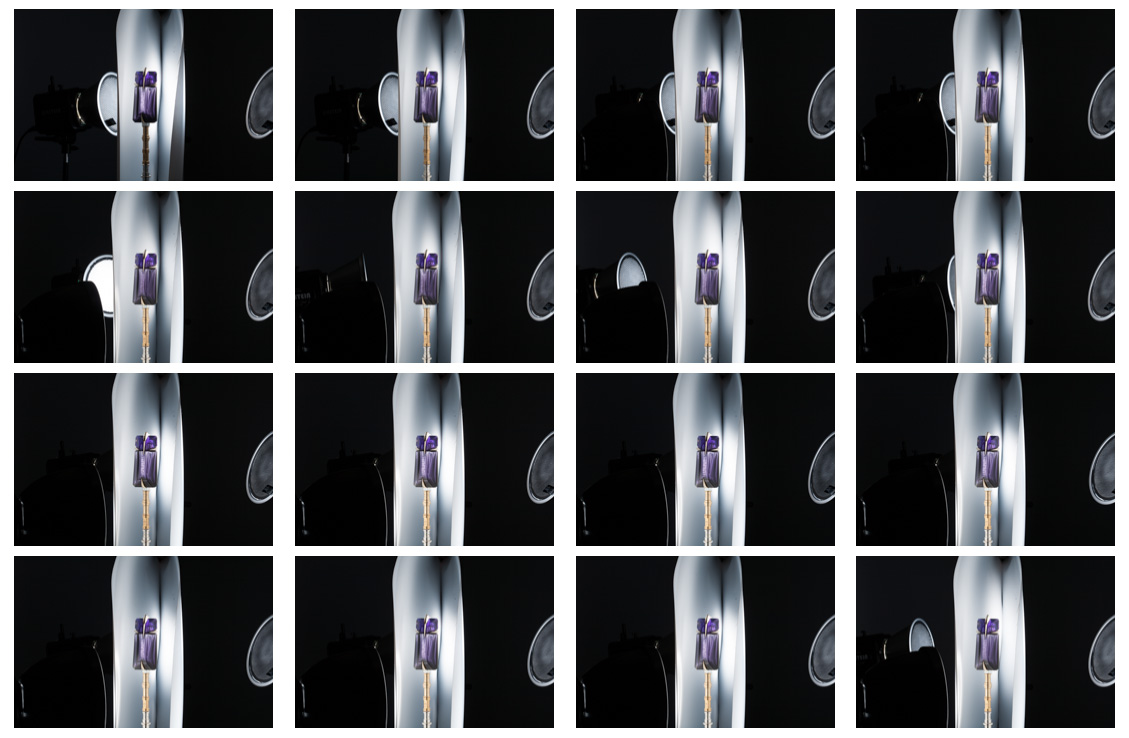
Above: A series of images showing the progression of lighting the bottle. I tend to take a lot of images rather than use the modeling lights on high power settings too much, I’m wary of the reliability of these lights due to overheating despite the thermal cut out features.
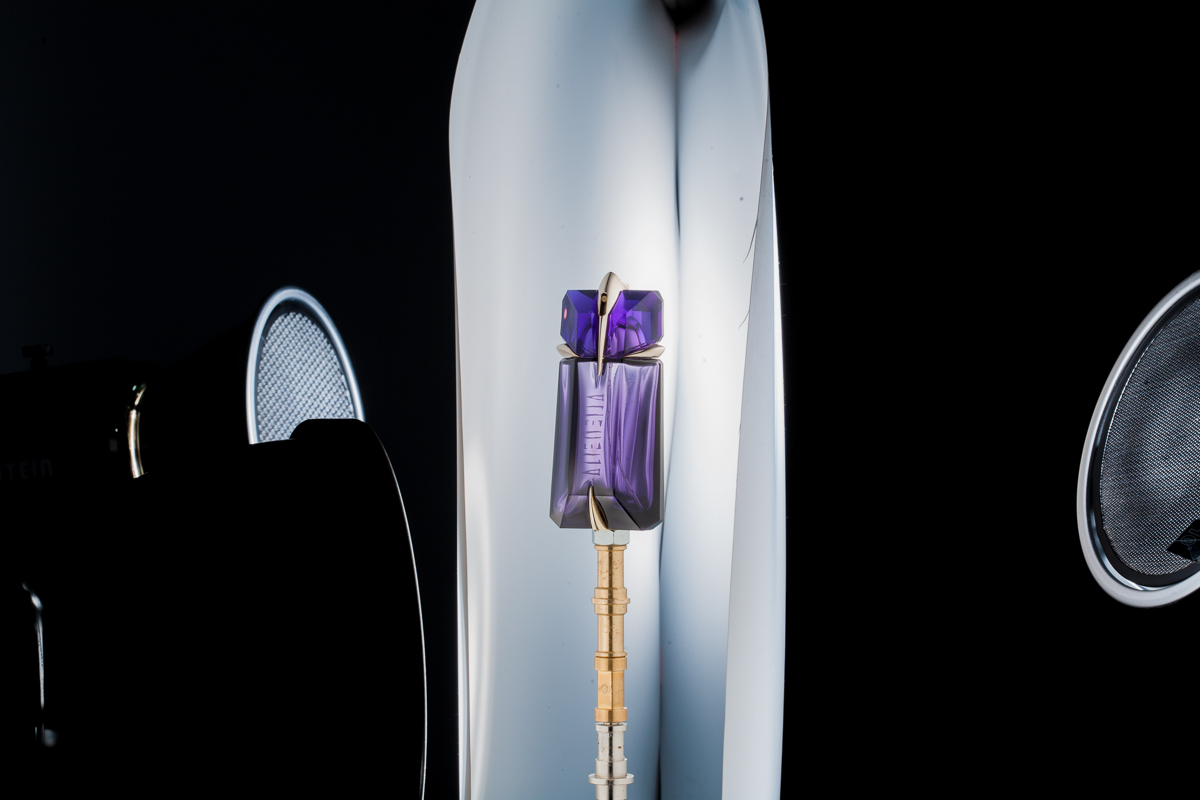
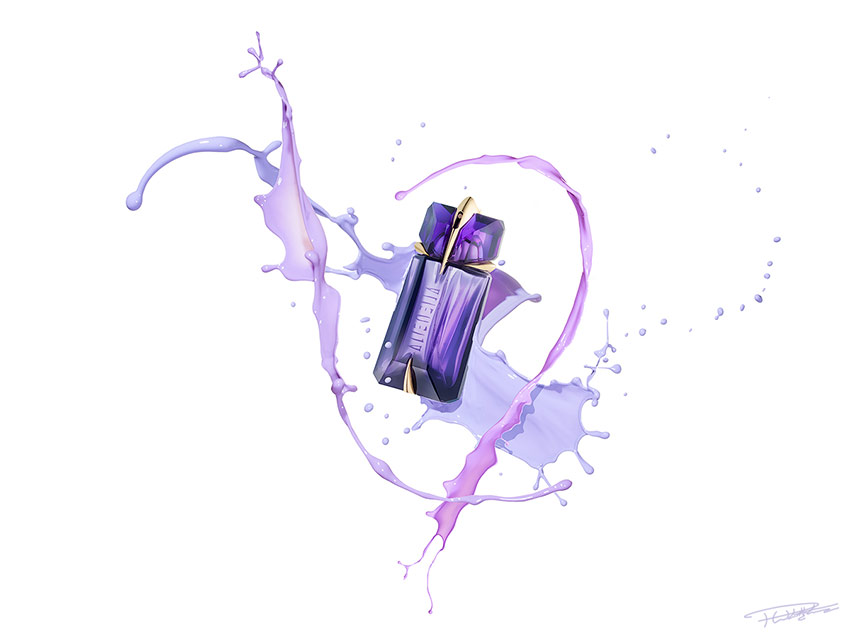
The above shot is the unedited RAW file selected to be used for the final shot.
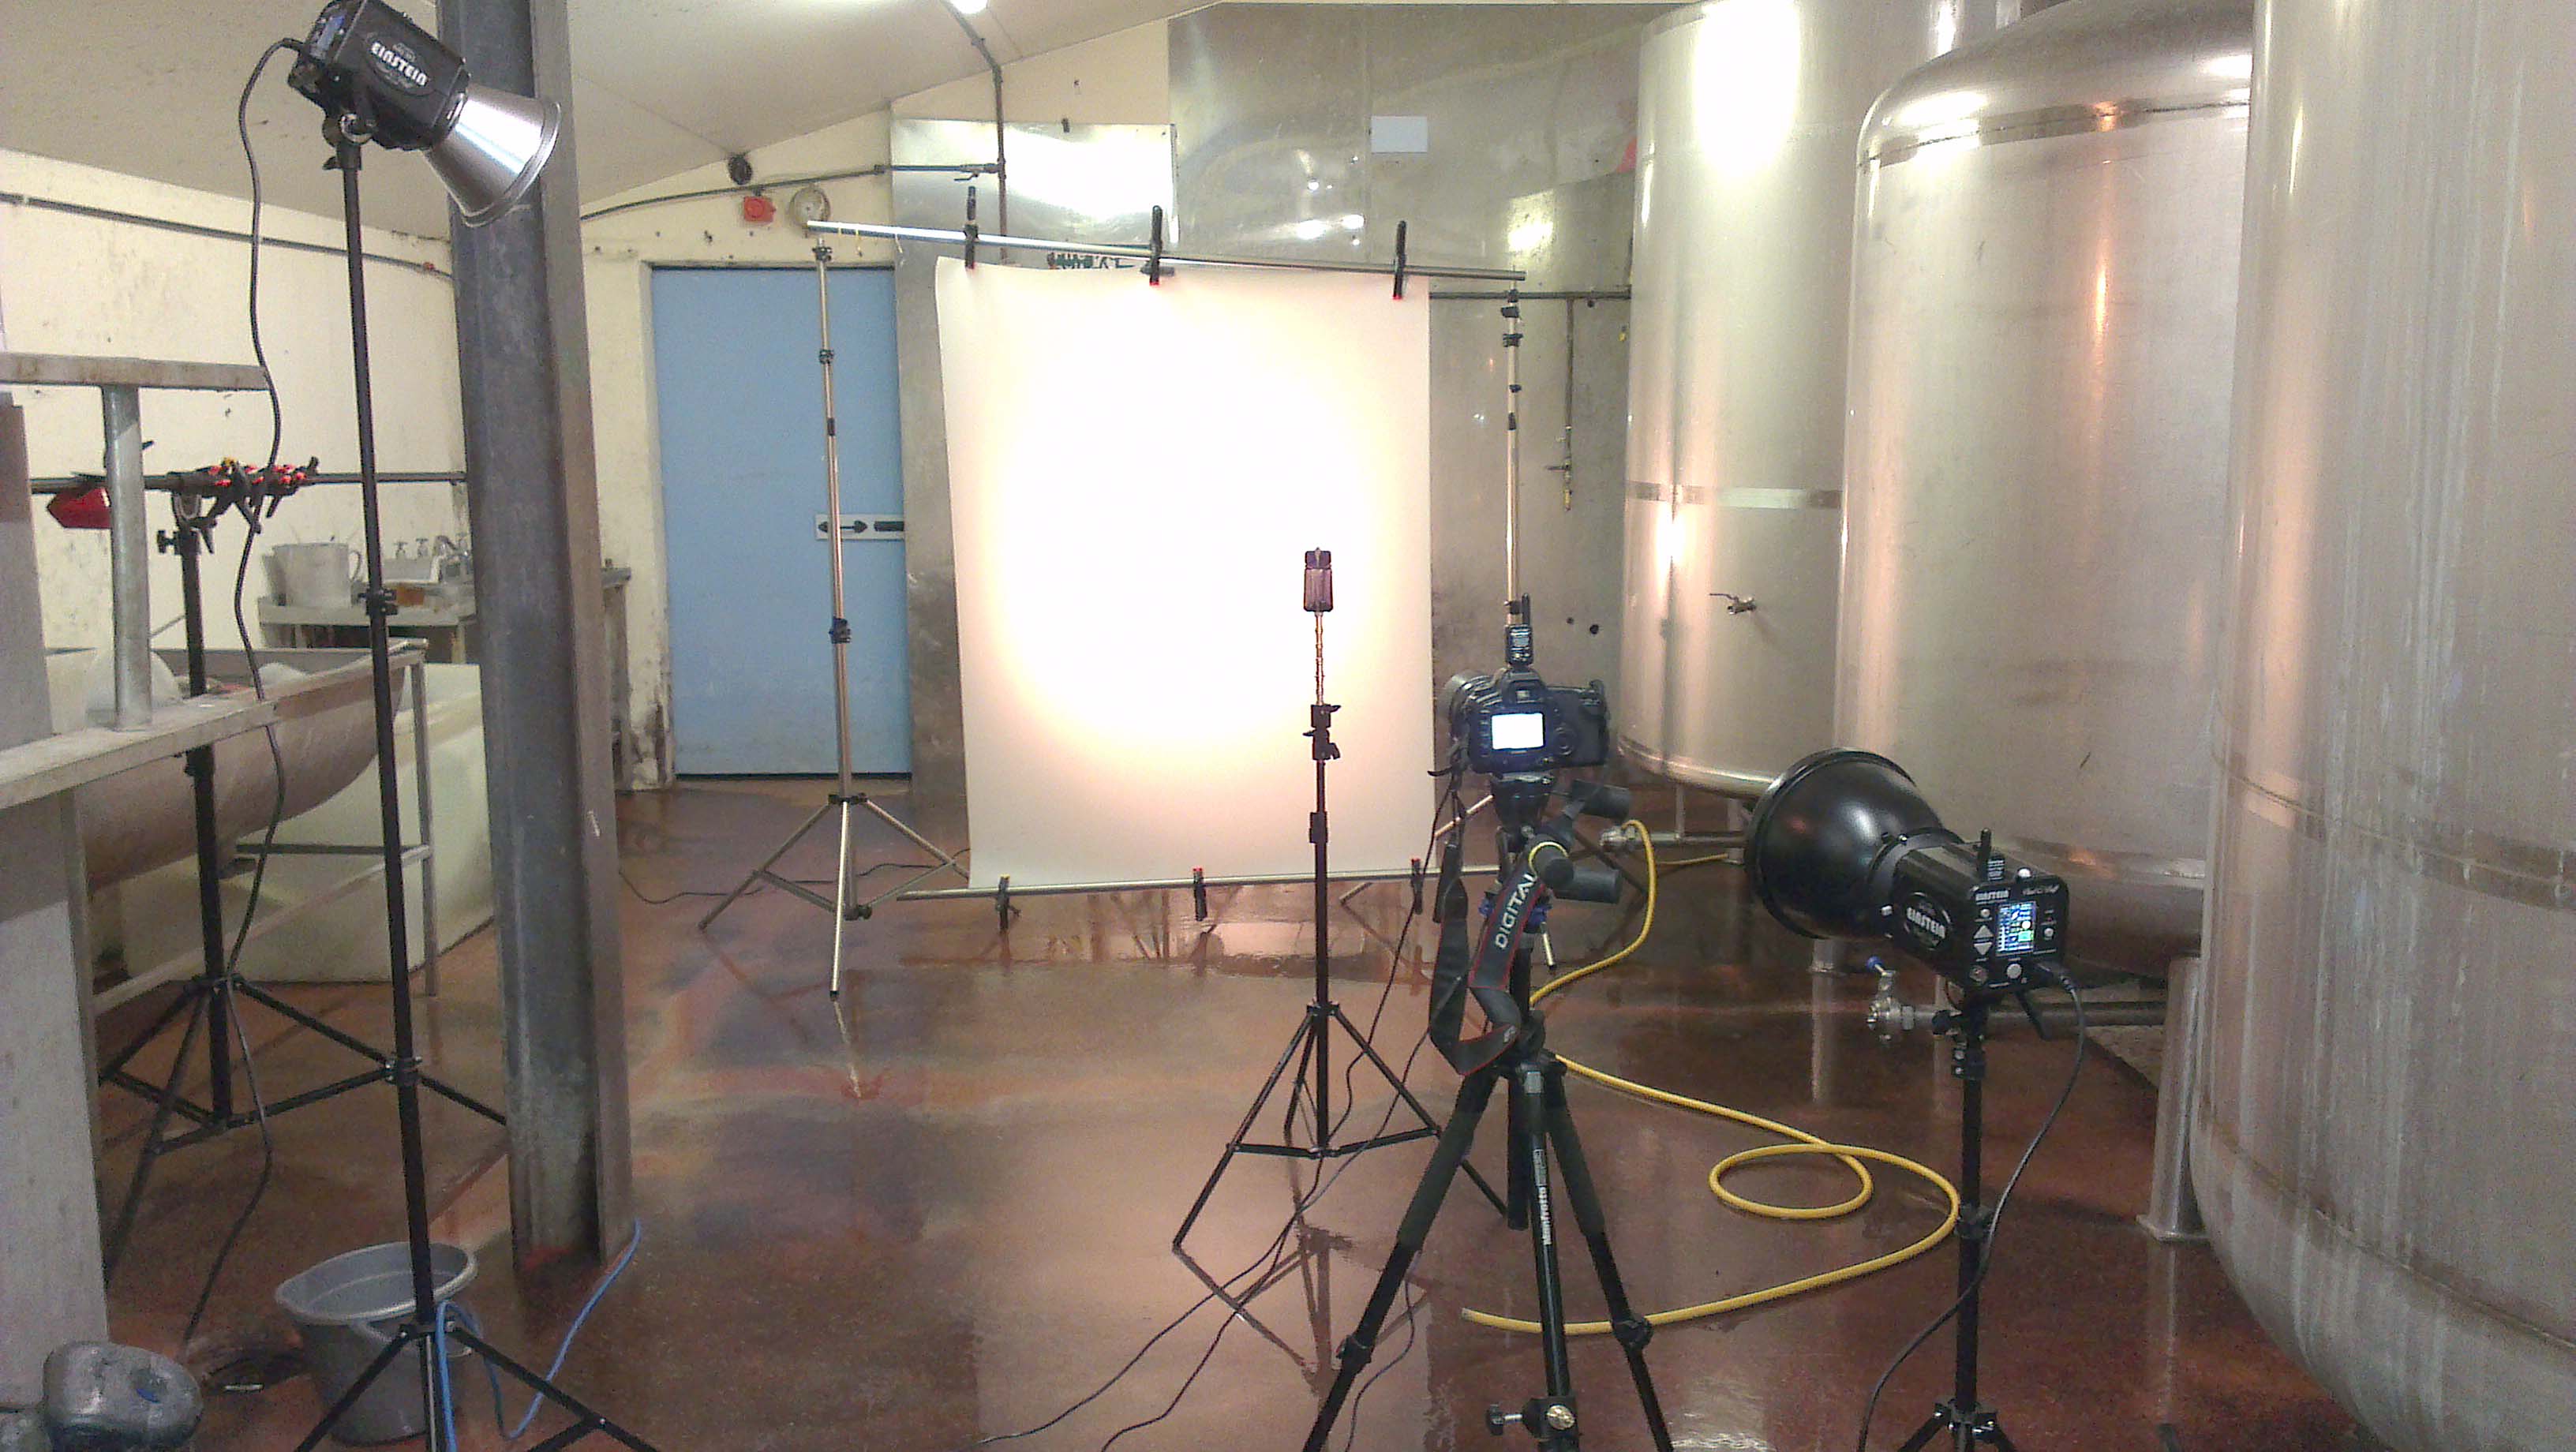
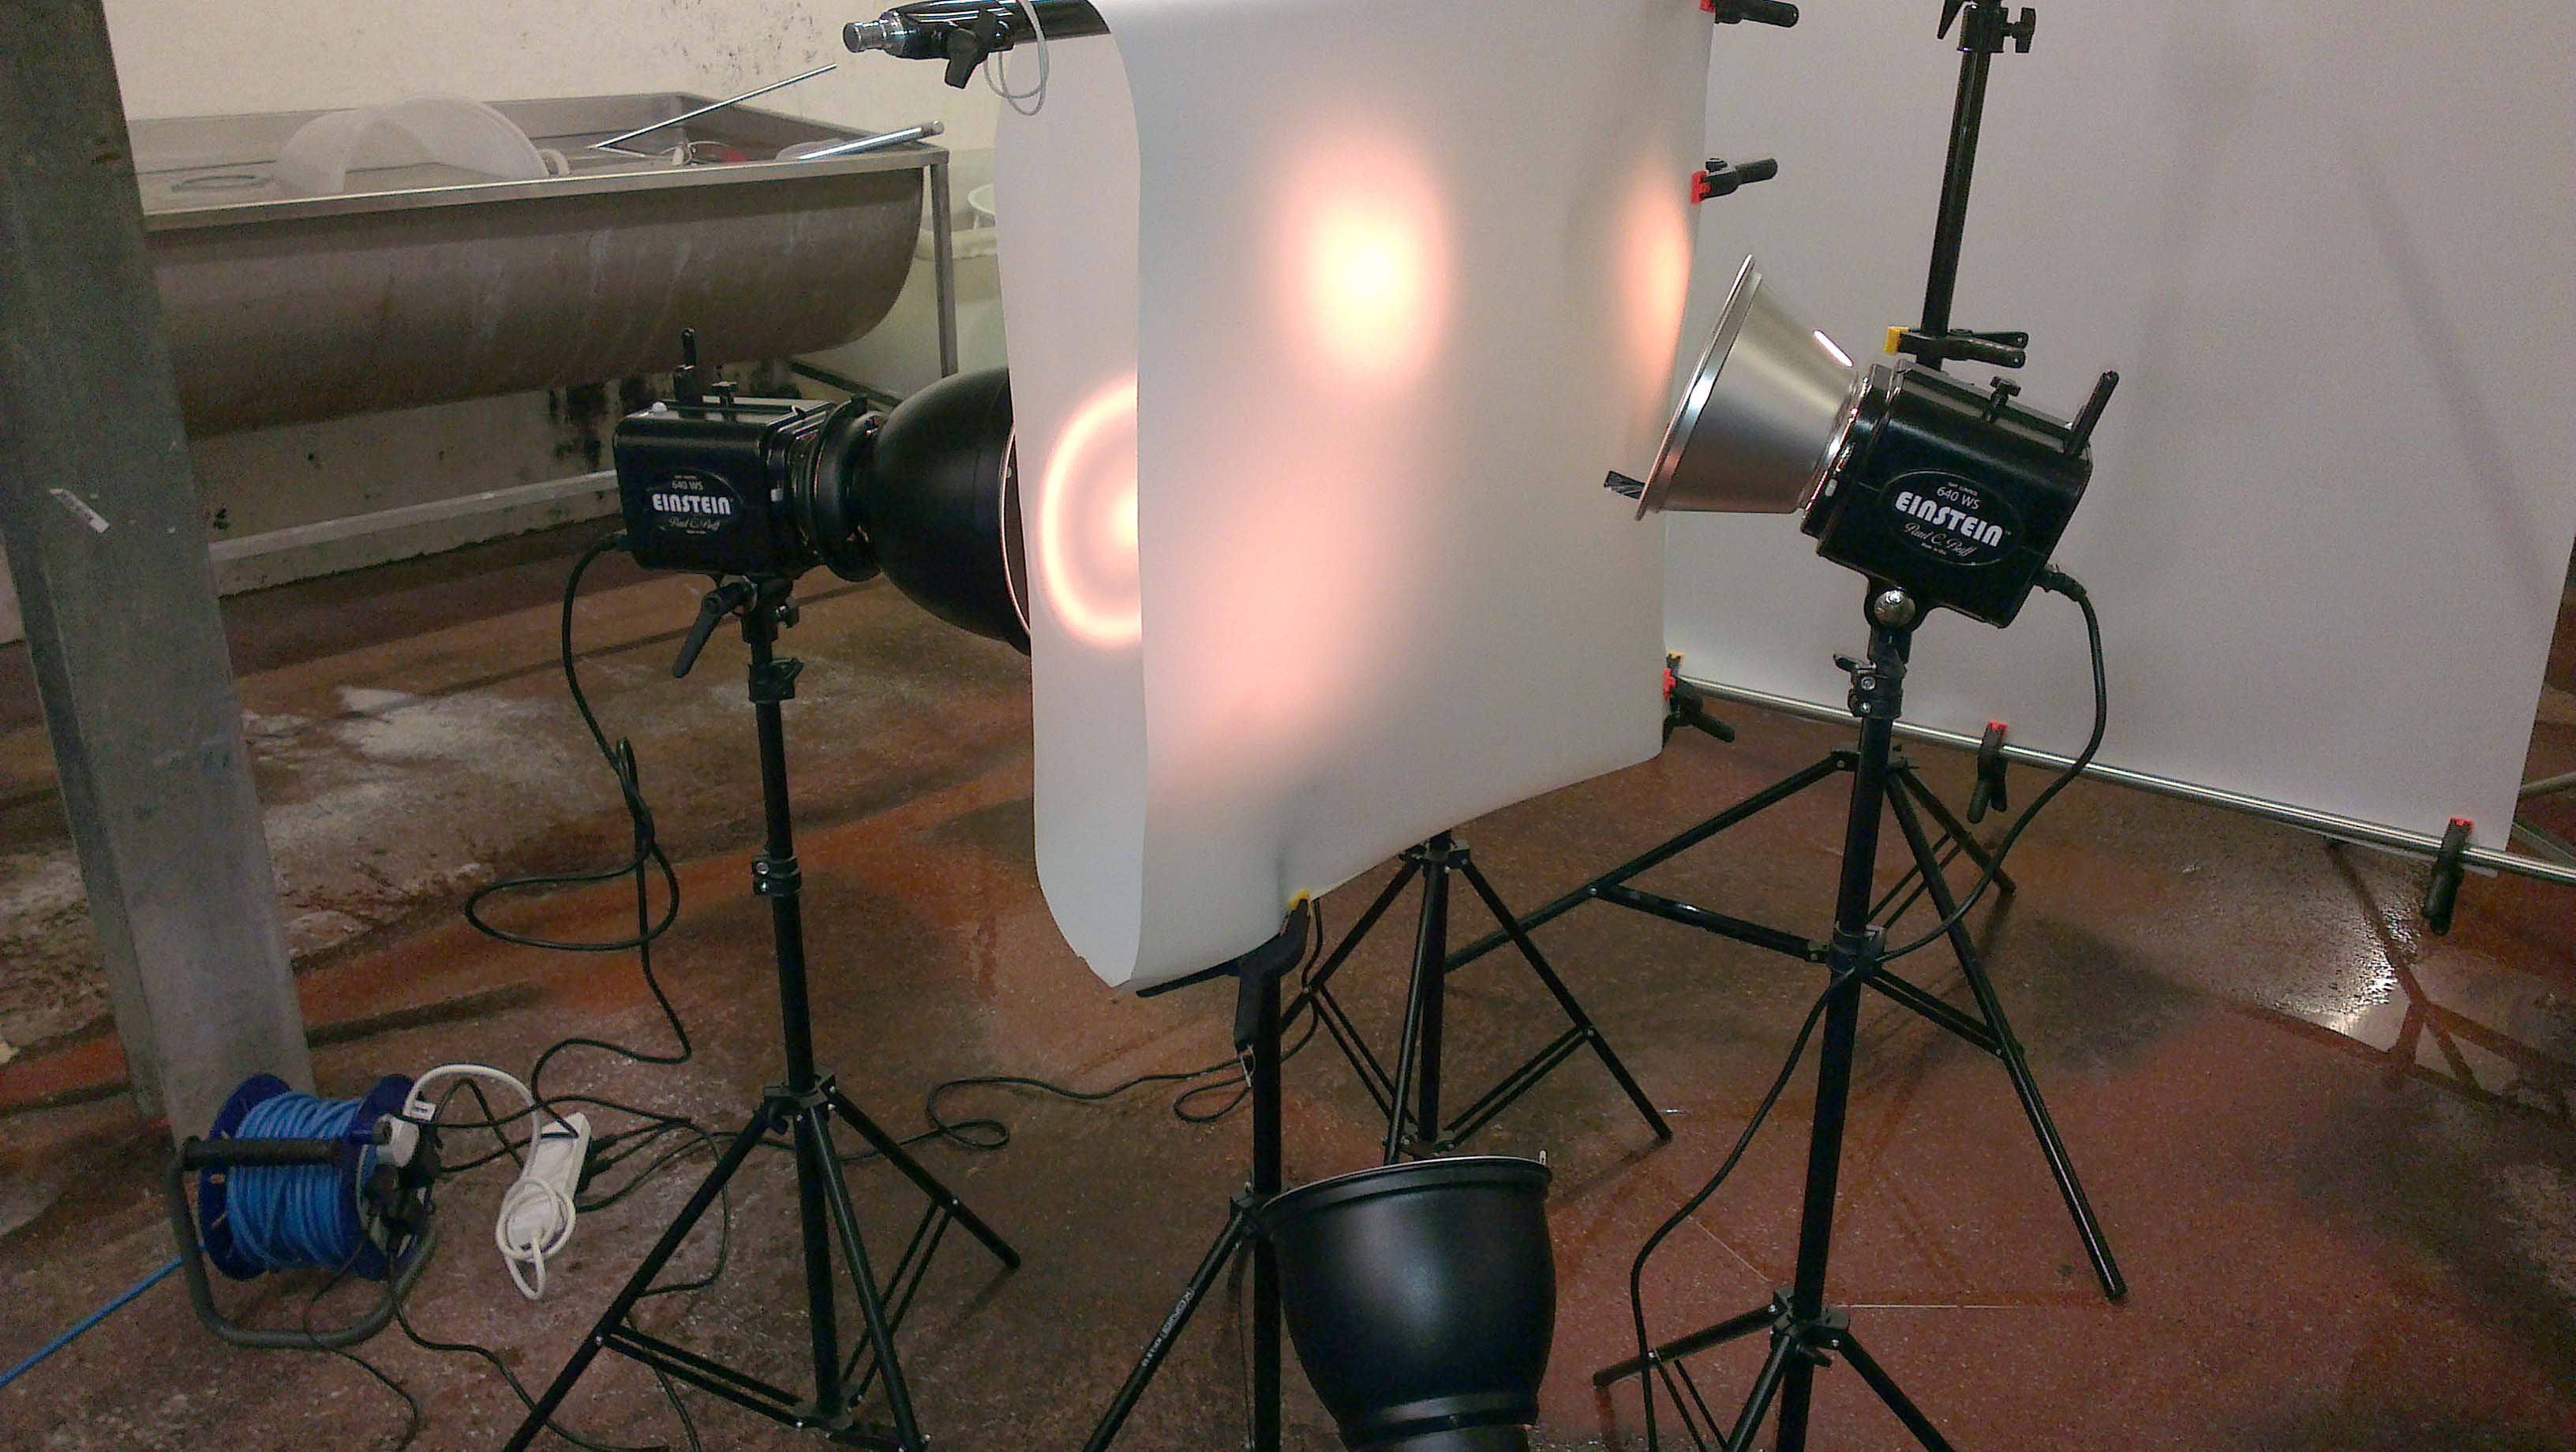
Above: The set up for the paint splashes.
Lighting of the splashes became a difficult decision due to the lack of options. Ideally I would of liked to mimic the type of set up Peter Schafrick uses. Basically that would mean shooting through a small hole cut in a very large sheet of Lee diffusion film (yep, the same guys who make the Nd filters). Additionally another large sheet is suspended above the subject area with the option of further sheets to the sides. Essentially Peter surrounds himself with diffusion sheets with the exception of the background, which is set farther back to allow separate lighting of it to that of the subject. This enables a huge amount of control when it comes to placing wonderfully smooth gradient transitions across flying fluids.
Well, I only have one roll of the Translum diffusion.. half of which you can see is hung as a background so that wasn’t going to happen. I made do with one light behind the background, and two 30 degree gridded lights to light the paint. The one high to the left was the key, to the right and much lower was the fill light. This was powered to a stop lower just to reduce the contrast of the shadows. FYI I elected against using softboxes or strip lights on these so as to keep the specular reflections on the paint very small and easily editable afterwards.
I then got to work on the messy part 🙂
I mixed a tin of purple acrylic paint (that’s good old emulsion for those of us in the UK) with water at a ratio of 2:1, if too much water is added the paint becomes very translucent.
Its not as easy as you think to create interesting splashes and I confess to having really fallen short in this area. By the time I’d started to get the hand/arm motions right, I’d more or less ran out of usable paint. Throwing it directly against the bottle didn’t work particularly well, I guess the shape of the bottle just didn’t lend itself to having splashes ‘wrap’ around it when thrown from behind. More likely it was my inability to time the shot perfectly though, its very difficult to get the timing right when your throwing with one hand and firing a shutter release cable with the other. Without having an assistant available to fire the camera, I’m finally going to need to use the TriggerTrap laser/light/sound triggering device that I’ve owned since January and have shamefully only done a few short tests with so far.
After quite a few shots with the bottle in frame (probably around 70) , I took it off the spigots and lowered the stand so they were just below frame. The stand was kept in place to use as a marker, I still needed to know where the point of focus was so I could throw the paint within the zone of sharpness dictated by the cameras aperture settings.

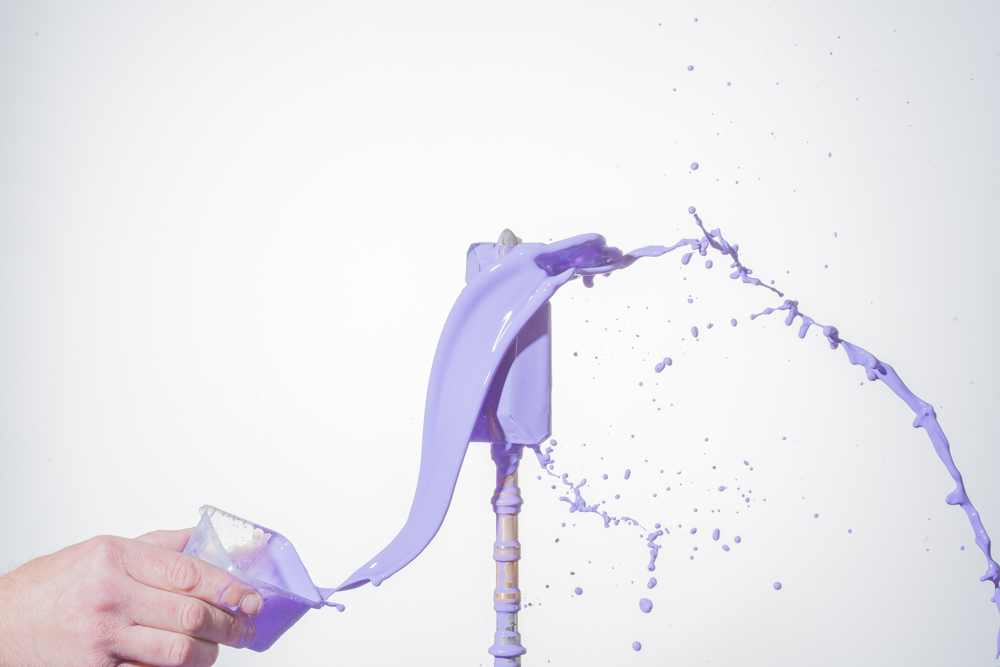
Be prepared to have a huge number of shots like above, unless you have a huge background or a high speed triggering device/assistant (or both). Just getting the whole splash in frame can be difficult without a device or an assistant firing the camera.
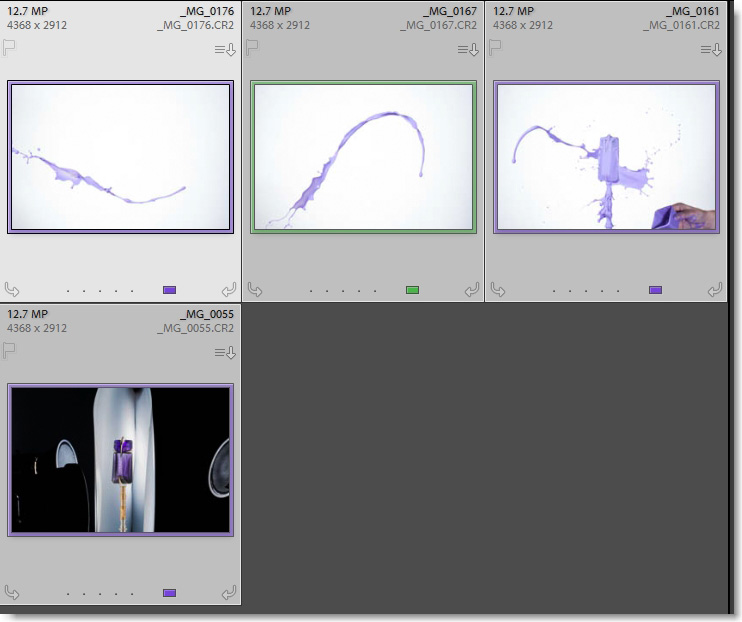
(Above) Out of a total of 185 shots taken (55 for just the bottle), these four were the final one’s selected for compositing. Edit: Img_0079 is missing from this screenshot (d’uh, my bad). You can see it masked so it sits atop ‘img_0161’ in the image below, although its actually below it in the layer stack.
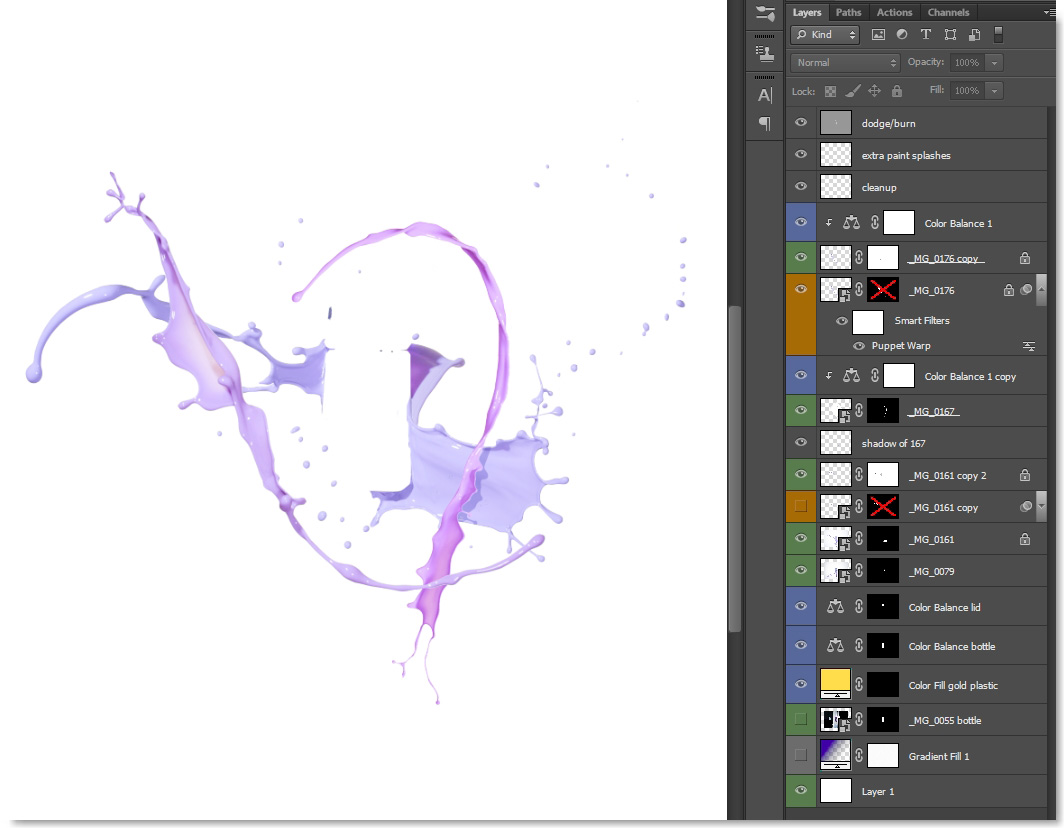
Here’s the final layer stack (above) with the imported image numbers retained. The bottle from “mg_0055” was opened as a smart object from Lightroom, then clipped out from its original background with the pen tool ( I’ve turned that layer off for this particular screen shot). The three splashes were also imported as smart objects, (actually just holding the shift key + dragging your background layer into the destination document will align them perfectly) into the master file.
I’ve named and colour coded each layer to try and make this stack easily understandable. But you’ll probably need to refer to the screenshot of the four final images used.
The green colour coded layers are the final visible layers in the shot (with the exception of the top three, which are just clean up and additions).
The blue coded layers are just the colour adjustments clipped to individual layers, so they affect only the layer they are clipped to (shown by the little precursory arrow pointing downwards).
The two amber coded layers are two of the original splash image smart objects that were imported. I ended up making rasterized duplicates of both layers (shown above each in the layer stack) because of the issues I regularly encounter with the puppet warp function in Photoshop CS6. More on that to follow.
Incidentally, you’ll notice three versions of ‘img_0161’ in the stack. The green coded layer shows only the right hand side of the splash. The amber version was puppet warped to reduce the size of the left hand side of that splash. The final copy was rasterized in order to clean up some jagged edges with the Liquify Tool.
Puppet warp: My Nemesis.
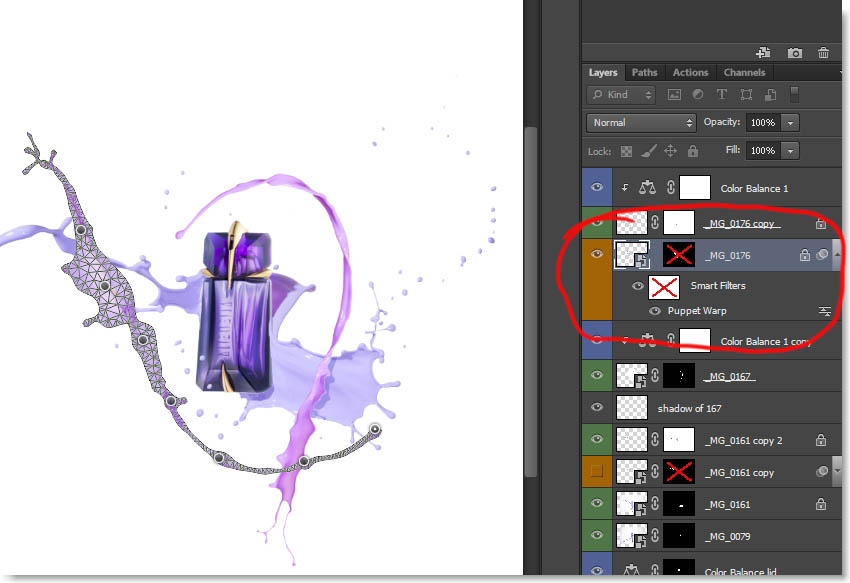
Seriously this filter drives me nuts. After masking out the original splash shape using whatever selection tool works the best (usually the quick selection tool and refine edge) I get to the puppet warp filter. Btw guys, for some reason CS won’t link the layer mask you just made for your splash – to the adjustments your about to make within this filter. Go ahead and Shift-click directly on the mask you just made to turn it off, but do this right after you’ve entered the puppet warp filter and just clicked on the big tick on the apply transformation bar or hit the Enter key to accept changes (you don’t need to actually make any changes at this stage). This way – the filter uses your layer mask to apply the changes you make to your splash rather than use the original layer. Remember to turn off your original layer mask before making any further changes.
For some reason in the above screenshot I’ve turned the ‘Smart Filters’ mask layer off (see within the red squiggle in the layer stack). Ignore this little omission, if you turn it off then puppet warp does its work on your original layer. Annoyingly (Adobe are you listening?), no pixels are displayed in the Smart Filters Mask to show the filter is now confined to a particular area within the mask, it just stays white unless you paint onto it. What we should be able to do is add a mask to each Smart Filter as its applied, rather than use the ‘Smart Filters’ mask as a global solution, much like when you currently add a mask to a group of layers.
I wonder if Adobe CC solves this problem? Answers on a postcard guys 🙂
Any road, my other niggle with puppet warp is what the mesh does to your precociously masked image. In the shot below you see the same area selected by puppet warp. You have no choice other than set the mesh Expansion to zero pixels otherwise it expands/contracts your original mask. Frustrating. This also limits the amount of ‘pins’ that you can place along your selection, because the closer together you place your pins; the more the filter struggles with the ‘elasticisity’ that its supposed to offer. Slight dragging or movements of the pins quickly introduce unwanted sharp edges or artefacts along the selection. This is the reason why I’ve ended up duplicating two of the layers (no’s 161 and 176) then rasterising them, and then using the liquify tool to round off any harsh edges.
I believe that the liquify tool in Photoshop CC can now be used as a smart filter, as such – it can be stacked along with other smart filter adjustments under your original smart object layer. This would be handy, but I’m still on the fence when it comes to paying a monthly subscription for a lot of applications that I’ll likely never use.
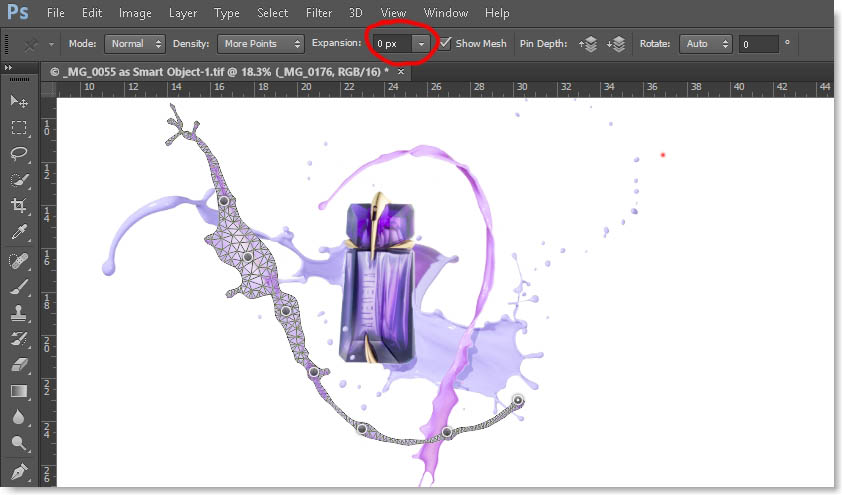
I generally try and add as few pins as possible along the length of the splash (or whatever it is your trying to bend), Adding an anchor pin at the extreme ends of the splash will refrain it from moving from its general position once you start adding more pins, and then begin selecting and dragging them to alter the splash shape. Another omission from the above screenshot is (sorry guys) to circle the density and mode selection boxes to the left of the expansion box.
Density allows you to increase or decrease the structure/points of the mesh, the three settings are: Fewer Points, Normal and More Points. Selecting More Points will give you a fine mesh that better handles more severe alterations.
Likewise with the Mode box: Distort, Normal and Rigid alter the ‘elasticity’ behavior of the mesh. Distort seems to let you push alterations that little bit farther before introducing unwanted artefacts.
Further edits involved:
A fake shadow produced from making a selection of ‘img_0167’, and simply painting a low opacity black brushstroke within that selection onto a new layer placed above ‘img_0161’.
A cleanup layer just to remove a few specular reflections off the paint and some unnoticed dust bunnies. The lid of the bottle also had a hot spot that needed taking care of.
Some extra blobs of paint were copied and pasted and placed around the image on another layer.
A 50% grey dodge and burn layer set to overlay blend mode, just to pick up highlights on the bottle in a few places.
I finished up by duplicating, flattening and rotating the image slightly clockwise. Finally I ran the Topaz Clean Filter over the image at varying settings. A nifty filter that’s great to use for getting rid of noise or for smoothing out surfaces. It can also define edges very well if used sparingly.
Well that’s it guys. I’m happy with the overall look of the image, despite it being a far cry from my original vision. If it taught me anything, it’s that more practice with splashes is required on my behalf…
 |
In the Gearbox |
|
Canon 5D Canon EF 100mm f2.8 macro (non IS) Manfrotto legs 5m (15′) manual shutter release cable 4x PCB Einstein E640’s PCB Cybersync Commander RF triggers + receivers PCB + Bowens reflectors and grids Boom arm Light stands Savage Translum plastic diffusion material |

I didn’t understand the water balls. Are Those water Balls ora gel Balls where’d you find them?
thank you