How to Shoot Watches with DIY cone
Photography Tutorial

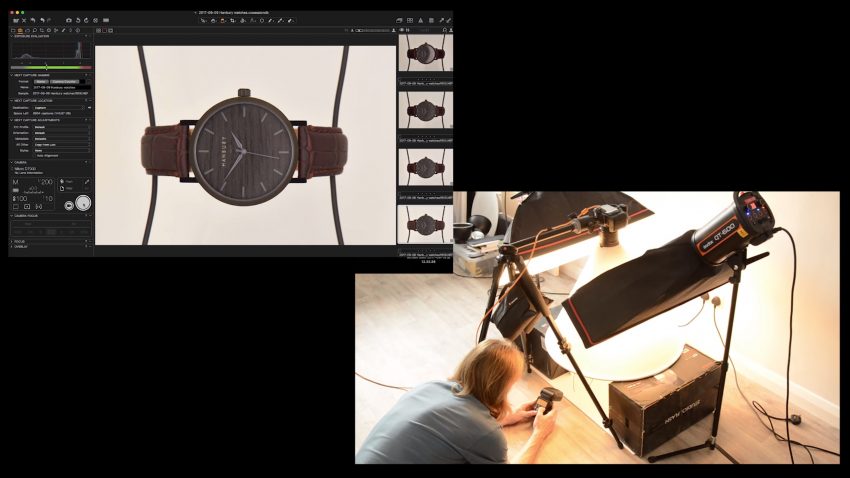
Take a look behind the scenes of how we shoot watches in this product photography tutorial!
Ian explains the equipment he uses, how to hold the watches in place when shooting them and, most importantly, the lighting Ian uses to create stunning images of watches.
See how Ian setup lighting, use a tethered camera to view the images as we shoot.
How to Shoot Watches with DIY cone
How to Shoot Watches with DIY cone
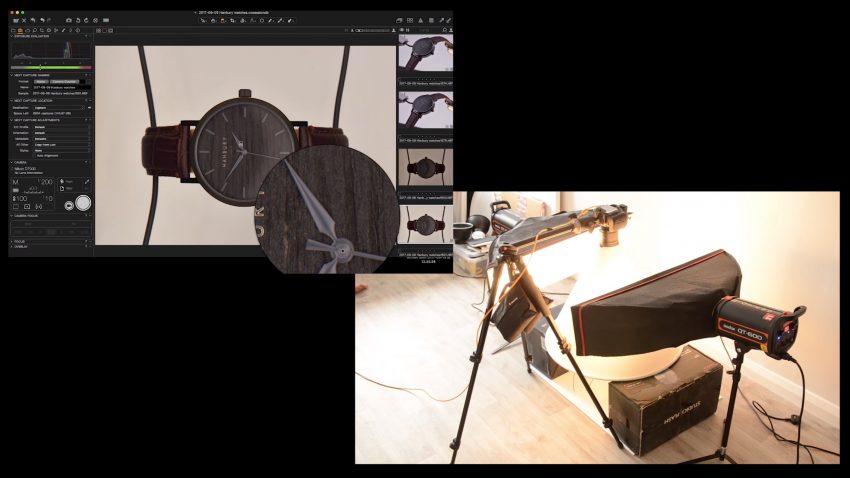
Source of light
The principal source of light for this shoot is a shooting cone. This is essentially a cone shaped contraption made out of a diffusing material. The watch is placed directly underneath the larger opening, with lights flooding in from either side through the diffusing material. You would be shooting through the top opening looking straight down at the watch.
Shooting platform
It is very important for the photographer to have a steady platform to shoot from. Meaning, your camera, regardless of the image stabilization option, must not be hand-held or be placed on a make-shift platform (unreliable) platform. You endanger not only your equipment but also risk the quality of the images that you end up getting. Long story short – a tripod is an absolute must.
Focus Stacking
Another big reason for using a tripod is that you would likely be using the technique of focus stacking. Focus stacking combines several images each shot at a different focusing distance and then combining everything in post-production to produce a large depth of field. The basic aim is to produce a vast depth of field, usually while using a wide aperture, something that is optically impossible with a single frame.
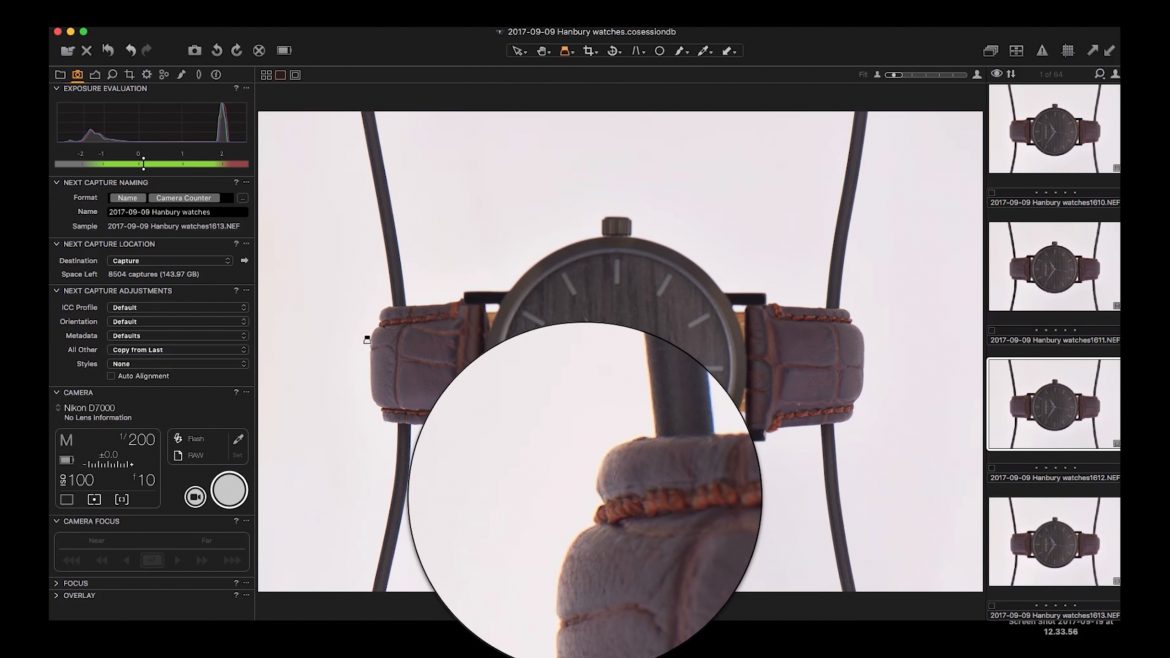
Tethering
Not necessary but it adds a bit of convenience that only professional product photographers can appreciate. Tethering ensures that your image files appear on your favorite post-processing application right after it is captured. It adds several conveniences.
First, your images are transferred seamlessly to your laptop. You can make several quick and necessary adjustments like white balance, cropping, lens profile corrections etc. right at the time of the shoot.
If your client is there with you at the shoot you have a way to show the work being done. Additionally, a larger laptop window allows you a better view of the images, in full screen to check for quality and for errors before it is too late.
The right Camera and Lens
Though any camera will do when shooting watches and small products such as these, you need the right lens. And the right lens is the one that comes with macro shooting properties. A true blue macro lens is one which has a very small working distance (from the subject to the lens) which in effect is able to produce a life-sized reproduction of the subject on to the sensor.
If you don’t have a true macro lens, then any lens that has the ability to shoot from a very close distance would be suitable. For the record, Knaggs uses a Nikkor 105mm macro lens paired with his Nikon D7000.
Props
Not so much for aesthetic reasons but more for the purpose of keeping the watch held in place. Ian Knaggs uses a plastic box with two wires going through the top end. These are the wires that hold the watch in place. The exposed wires can easily be removed using the Healing Brush tool in Photoshop or other equivalent photo editing tool.
The Right Lighting
Strobes are fine. Strobes gives you an incredible amount of power at your disposal. Plus, they have a faster recycle time when compared to smaller speedlights. This helps in getting a lot of shots in a small amount of time. Additionally, you have a far greater number of light shaping options available compared to speedlights and other types of lights (mainly continuous). Choose strobes that come with a modelling light.
The continuous light will help you to set-up your shots as well as focus your composition. Modelling light will not be suitable for testing the exposure though, so you still need to fire the strobe(s) and make a few test shots in order to estimate the ideal exposure.
Setting Up
Setting up requires a careful measured approach. For this switching to live-view and using the tethered feed on your favorite editing tool is recommended. Here Knaggs uses Capture One and live-view shooting on his D7000.
Setting up the lights, the focusing etc. requires that you employ a trial and error method. Take a test shot to check for focus, and then keep adjusting the exposure by opening (or closing the aperture as required), adjusting the right shutter speed and the right ISO until you find the exposures are turning up as expected. Move your lights if you have to. This is a slow and steady process of building your shot.
Focus
Manual focusing is the best way to go about when shooting products such as watches. Manual focusing allows you to precisely nail focus exactly where you want to. Some cameras comes with the Focus Peaking feature.
This functionality is very useful for manual fine tuning of focusing. To confirm that you have focus make sure to check the test shots by magnifying them on your laptop.
Fill Lights
Shadows are inherent, even if you are meticulous in arranging your lights. Sometimes it is the texture of the product and the way it reflects light which makes it difficult to light the product uniformly. For example the dark leather strap of a watch and the shiny metal body. They can’t be illuminated the same way. Sometimes it is about the way you have your lights set-up which creates shadows in pockets.
Any type of fill options can be used. There are many cheap and yet effective ways to fill in shadows. These include small reflectors, foam core and even small speedlights set to a low power output.
The way you set them up depends on the look and feel of the final images. It also depends on the available light and how it is spread across the product. There is no hard and fast rule about this. This is all about eyeballing the final result on your laptop.
Final Thoughts
Once the set-up and lighting is perfected, make as many shots as is necessary. If you have to make several shots for stacking purposes (the shots have different focusing points) make sure that the camera is not accidentally knocked about as you change the focus point manually. This can ruin your shots and you would find it difficult to align later on in post.
 |
In the Gearbox |
|
Nikon D7000 Nikkor 105mm f/2.8 IF-ED Micro Godox QT600 90 x 20xm strip boxes. Not branded. DIY shooting cone |
