Select Page
Multi-Layer Composing In Jewelry Photography
Pro Club Workshop #91
Multi-Layer Composing In Jewelry Photography,
Pro Club Workshop
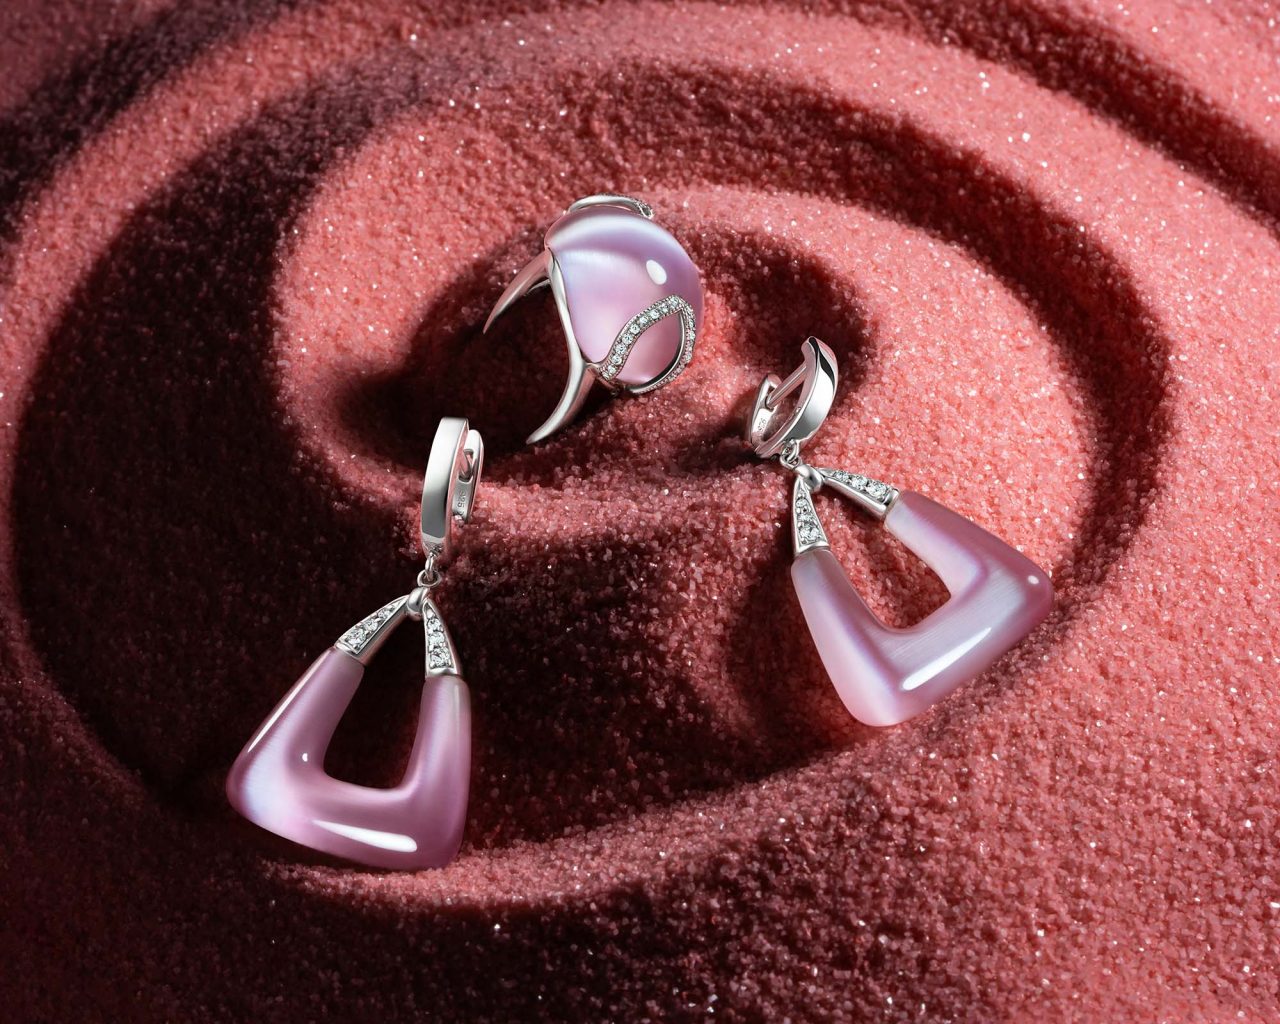
This is a jewelry photography tutorial for the Professional Interactive Education Program, Workshop #91
In this workshop, students will learn how to use creative lighting techniques to create an eye-catching image without spending too much time setting up a perfect light for each element of the composition.
For example – sharp and contrast light works great for the sand we used as a background for this image but has a devastating effect on tiger eye gemstone and polished metal. In this workshop, we’ll show you how to shoot each element of the composition with perfect light and then combine all images into a dynamic and eye-catching final photo.
This workshop will be great for photographers with a good experience in jewelry shooting, as well as beginners. Retouchers will also find plenty of great information here, we have over 2 hours of post-production in Adobe Photoshop included in this workshop.
Your instructors for this workshop are Alex Koloskov and Anna Kevorkian.
Enjoy our previous jewelry photography workshops:
- Jewelry Photography Workshop #89
- Jewelry Photography and CGI, Workshop #87
- Jewelry Photography Workshop #86
Deadline for homework submission: June 19, 2022
The date of the live review: TBD | 1pm PST

Meet your instructors

Alex Koloskov
Alex is one of the worlds best commercial advertising photographers, co-founder, and teacher at Photigy.com
He is also the man behind Photigy’s most popular courses and tireless idea generator
Anna Kevorkian
Art director, photographer in Visual Concept Solutions.
She believes in intelligent creativity. The success of a project must be predictable because there is always a way to calculate the route to the desired outcome.
In-Studio Photography Tutorial
🔒 VIP members only
Become a VIP member to watchPost-Production Tutorial, Part 1
🔒 VIP members only
Become a VIP member to watchPart 1: Lightroom Job
Picking the images for further compositing, setting white balance, color, exposure, and contrast adjustments
Post-Production Tutorial, Part 2
🔒 VIP members only
Become a VIP member to watchPart 2: Layering, Background Fixes
Stacking all the chosen images. Working on background: merging, texture works, smoothing the surfaces.
Post-Production Tutorial, Part 3
🔒 VIP members only
Become a VIP member to watchPart 3: Silver Parts Layering
Masking, compositing, and edge refinements of the metallic parts.
Post-Production Tutorial, Part 4
🔒 VIP members only
Become a VIP member to watchPart 4: Silver Parts Retouch
Cleaning the metal from scratches, dust, and other imperfections.
Post-Production Tutorial, Part 5
🔒 VIP members only
Become a VIP member to watchPart 5: Cat-Eye Stones
Combining layers together using the blending function. Cleaning and reflections retouch with frequency separation technique.
Post-Production Tutorial, Part 6
🔒 VIP members only
Become a VIP member to watchPart 6: Pave Works
Compositing a layer with the little zircons, color, contrast, and texture adjustments.
Post-Production Tutorial, Part 7
🔒 VIP members only
Become a VIP member to watchPart 7: Final Tweaks
Cleaning up the edges, removing little flaws from the background, and final crop.
Final Image
Before-After the post-production
 AFTER
AFTER
 BEFORE