Of smoke:
a field guide to photographing smoke
By Alex Stepanov
Of all the subjects I get to photograph in my studio, a few could rival the graceful beauty of smoke; also true that not many subjects are as capricious and temperamental as smoke. While smoke is used as an important element in many advertising images, it is also fun to work with and, if everything works out to your benefit, you will be rewarded with the most beautiful abstract images that are virtually guaranteed to wow your audience.
Preparing for the shoot
Photographing smoke is fairly easy but requires a certain amount of preparation. First, you will need the source of smoke. Perhaps the most common and the easiest way of producing uniform and steady stream of smoke is burning incense – you can find the incense sticks in many Chinese and Indian stores as well as in many “smoke shops”. A word of caution: most of the incenses are very strong – if you are not sure which one is right, be sure to ask for the lightest available. It will be pretty strong still but perhaps a touch less so than the “regular” stuff.
The next thing to consider is to choose the right room for the shoot. Please keep in mind, we are dealing with slow burning fire so safety first – make sure there are no flammable materials or gases around (no gasoline containers, paper shreds etc.); that means your garage is probably not the best place for this type of shoots. The room should be large enough and well ventilated to allow for burning incense for a period of time (usually about 30 min at least) without “fogging” the entire room. Ideally, you will want to have some air flow in the room (it will create those beautiful curves and wisps) but not too much – a fan in the corner or strong drought from the open window could easily ruin the entire shoot.
Setting up
Now that we have the source of smoke (incense sticks) and figured out where to shoot, we are ready to start setting things up. For the purpose of this particular demonstration, I used a studio strobe; if you are not up to doing it on the grand scale, then the same setup could be easily reproduced as a tabletop with off-camera portable flashes. To illuminate the smoke, we need strong side light – the more power the better; strobes work best because they allow us to “freeze” the smoke and minimize the blur.
Our goal is produce a well illuminated stream of “gray” smoke against completely dark background – it will make further post-processing much easier in case you decide to invert the image and add some coloring later. On that end, we want to avoid any light spills onto the background; for this shoot I used a narrow “strip” softbox but the same result could be very easily achieved with a piece of foamcore or some cinefoil (or even a recycled shipping box, as one of the readers reported). The following diagram shows an easy “10 minute” way to set up your shot:
Note that the light is pointing at the smoke source and is turned slightly away from the background but not too much as you want as much coverage in the horizontal plane as you can get – the smoke flow can be unpredictable and you want to cover as much area as possible. As far as the camera concerned, my personal preference is to put the camera on tripod and pre-focus the lens on the tip of the incense stick, then switch to manual focus. I also prefer using cable release, which allows me to move around more or less freely.
Metering light for the smoke shot is fairly straightforward – read the light at the tip of the incense stick with the meter dome pointing towards the lens, then open up the lens about 1.5 stops and put your camera in manual exposure mode. All the images for this article were shot at f/8; you may need to go even wider depending on your strobe power but try not to open too wide – the smoke can blow every each way and you may loose an otherwise beautiful shot due to severe out-of-focus issues. Take a test shot to make sure your background is completely dark, readjust the light position if needed. Now you are ready to start shooting. Light up the incense and take a few setup shots to verify the exposure, and then – shoot away!
A few final tips: smoke flow tends to be very fluid and often unpredictable so be ready to follow with your camera if needed. My personal preference is to keep the tripod head slightly loose so I could turn it without knocking off the entire set. Sometimes, I create air movement around the camera with a piece of a cardboard – try it and see if it works for you and what type of motions yields best results. As with liquids, you will need to shoot a lot of frames to get a few good ones, so be patient and have fun!
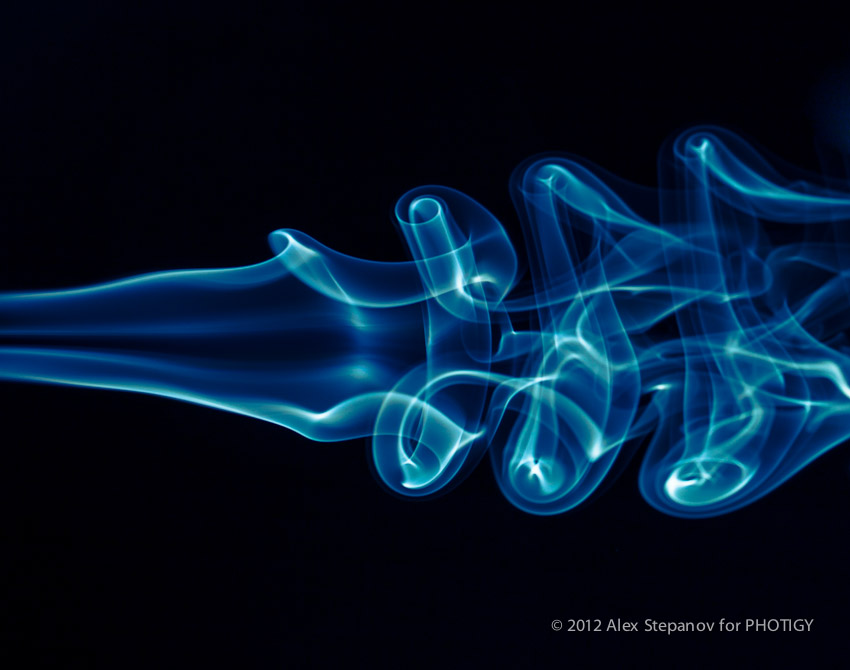
Below are some examples of the final shots; the only post-production manipulation was cropping out the unwanted parts and applying some slight contrast adjustments.
Smoke – resulting shots
Technical Data
Camera: Canon 5D Mk II
Lens: Canon 50mm 1:2.5 Compact Macro
Light: WhiteLightning X800 monolight
Tripod: obviously 🙂
Have fun and never stop experimenting!
Cheers,
Alex Stepanov, Photographer


 Only for Pro Club Members


